How I Fixed: Electron builder rcedit-x64.exe”: file does not exist

This is likely a very specific issue to my setup, but on the off chance this helps someone, I figured I would share it.

During Electron builds, whilst building for Windows (NSIS) using GitLab CI on Windows, I kept hitting the following error, causing the build to fail:

   ⨯ cannot execute  cause=exec: "C:\\Windows\\TEMP\\electron-builder-cache\\winCodeSign\\winCodeSign-2.6.0\\rcedit-x64.exe": file does not exist
                     command='C:\Windows\TEMP\electron-builder-cache\winCodeSign\winCodeSign-2.6.0\rcedit-x64.exe' 'C:\gitlab-ci-runner\builds\3RB9ixUo\0\affiliatestatstracker\app\release\win-unpacked\Affiliate Stats Tracker.exe' --set-version-string FileDescription 'Affiliate Stats Tracker' --set-version-string ProductName 'Affiliate Stats Tracker' --set-version-string LegalCopyright 'Copyright © 2020 A6Software' --set-file-version 1.10.0.111 --set-product-version 1.10.0.111 --set-version-string InternalName 'Affiliate Stats Tracker' --set-version-string OriginalFilename '' --set-version-string CompanyName A6Software --set-icon 'C:\gitlab-ci-runner\builds\3RB9ixUo\0\affiliatestatstracker\app\release\.icon-ico\icon.ico'
                     workingDir=
   • Above command failed, retrying 0 more times
 error Command failed with exit code 1.

The fix to this is to ensure the GitLab CI Runner is running as an admin user.

In my case, this means starting Power Shell using “run as administrator”, and then stopping / restarting the GitLab CI Runner.

My issue was caused, it would seem, by running the runner outside of the administrator mode / in regular Power Shell. I don’t use Windows much, sue me.

Anyway, another debug step on this one is to browse to the GitLab CI runner directory, go into the builds directory, right to the dir where GitLab CI left all the files after the previous run failed. From there, you should be able to manually build the project. If you can, likely you have the same issue I had as above.

Like I say, a very specific issue. But hopefully it helps someone, at some point.

Testing React withRouter

One area I’ve always found tricky when writing tests for React is where Higher Order Components are involved. I’ve found this complicates the test setup process. There are ways around this, which may or may not be possible depending on many factors. Sometimes you work on third party code that won’t accept ‘dramatic’ refactors just to scratch your own testing itches.

One example of where this problem might occur (particularly if you don’t read the docs!!) is with React Router, specifically when using withRouter.

const MyComponent = ({ history }) => { ... });

export default withRouter(MyComponent);

In this example I have MyComponent which wants to history.push('/some/location') when the user completes some action.

I’d like to test that this process takes place as expected.

Here was my first attempt. This way works, but there are some drawbacks:

import { createMemoryHistory } from 'history';
import { Router } from 'react-router-dom';

// ...

  it('should redirect when on the happy path', () => {
    const history = createMemoryHistory({
      initialEntries: ['/starting/point']
    });

     const { getByLabelText } = render(
      <Router history={history}>
        <Provider>
          <MyComponent />
        </Provider>
      </Router>
    );

    expect(history.location.pathname).toEqual('/starting/point');

    const myInput = getByLabelText('Some label text');

    const value = { target: { value: 'a value here' } };

    fireEvent.change(myInput, value);

    fireEvent.keyPress(myInput, { key: 'Enter', code: 13, charCode: 13 });

    expect(history.location.pathname).toEqual(
      '/path/when/redirected'
    );
  });

This works.

There are a couple of drawbacks to this:

  • It involves a couple of extra imports.
  • Behind the scenes, withRouter is still used (afaik) but by wrapping in another Router, we can override the history prop.

As this particular approach is so common, React Router gives us an alternative / preferable way to test this workflowWrappedComponent.

  it('should redirect when on the happy path', () => {
    const history = { push: jest.fn() };

     const { getByLabelText } = render(
      <Provider>
        <MyComponent.WrappedComponent history={history} />
      </Provider>
    );

    const myInput = getByLabelText('Some label text');

    const value = { target: { value: 'a value here' } };

    fireEvent.change(myInput, value);

    fireEvent.keyPress(myInput, { key: 'Enter', code: 13, charCode: 13 });

    expect(history.push).toHaveBeenCalledWith(
      '/path/when/redirected'
    );
    expect(history.push).toHaveBeenCalledTimes(1);
  });

The necessary actions to ‘run’ this test are unchanged. However, there are fewer lines as we can make use of the existing constructs provided by React Router to aid our testing workflow.

This may have been extremely obvious to you.

I can’t remember if WrappedComponent has always been available and I have overlooked it, or it is something new since I last had to do testing with a project using React Router.

Either way, it’s time I refreshed my knowledge of the documentation. And hopefully this helps someone else when testing withRouter at some point in the future.

How I Fixed: UglifyJs Unexpected token: name (DropIn)

I’ve been trying – in vain – to build the front end for CodeReviewVideos. The issue I have been hitting upon is as follows:

ERROR in app.a2e9a6b7afa471d94d2b.js from UglifyJs
Unexpected token: name (DropIn) [./node_modules/braintree-web-drop-in-react/dist/index.js:109,0][app.a2e9a6b7afa471d94d2b.js:116396,6]

uglifyjs-unexpected-token-name-dropin

As the error states, the issue is with the UglifyJs plugin, which I use in combination with WebPack.

This is a frustrating show-stopping problem. Unless fixed, I couldn’t complete a build.

Here’s what I had in my WebPack prod config:

      new webpack.optimize.UglifyJsPlugin({
        beautify: false,
        mangle: {
          screw_ie8: true,
          keep_fnames: true
        },
        compress: {
          screw_ie8: true,
          warnings: false
        },
        comments: false
      }),

This was only in my WebPack prod config. Therefore I didn’t notice any issue until trying to build for prod.

Now, in truth, I didn’t write the code / config above. I copy / pasted from somewhere else (I forget where) and as it just worked I didn’t pay much attention to it.

When it stopped working, I got sad, then got on to trying to fix it.

My Solution

There’s a bunch of suggested general solutions to this problem. A quick Google will turn up plenty of GitHub issues. Unfortunately none of them were specific to my exact error.

In my case, as best I understand it, the Braintree Web Drop In React should have compiled the dist.js file down to ES5, but is instead, in ES6. I concluded this based on this and this.

dammit-jim-im-a-coder-not-a-webpack-genius
Dammit Jim, I’m a coder not a WebPack genius

Of course, I may be wrong.

Fixing this wasn’t that hard. I just needed to read the docs.

yarn add --dev uglifyjs-webpack-plugin

For me, this added:

"uglifyjs-webpack-plugin": "^1.2.4",

To my devDependencies in package.json.

After which I updated my prod.js WebPack config as follows:

"use strict";

const webpack = require("webpack");
const UglifyJsPlugin = require('uglifyjs-webpack-plugin');

module.exports = function() {
  console.log("BUILDING PRODUCTION");

  return webpackMerge(commonConfig(), {

    plugins: [

      new UglifyJsPlugin({
        test: /\.js($|\?)/i,
        sourceMap: true,
        uglifyOptions: {
          mangle: {
            keep_fnames: true,
          },
          compress: {
            warnings: false,
          },
          output: {
            beautify: false,
          },
        },
      }),

  });
};

I’ve removed everything unrelated to this specific problem.

After which I could get my build to work.

The 2018 Beginners Guide to Back End (JSON API) + Front End Development

It’s been a few weeks in the making, but I am happy now to reveal my latest course here on CodeReviewVideos:

The 2018 Beginners Guide to Back End (JSON API) + Front End Development.

This course will cover building a JSON-based API with the following back-end stacks:

  1. ‘raw’ Symfony 4 (PHP)
  2. Symfony 4 with FOSRESTBundle (PHP)
  3. API Platform (PHP)
  4. Koa JS (JavaScript / node)

Behat will be used to test all of these APIs. One Behat project, four different API implementations – in two different languages (PHP and JS).

We’re going to be covering the happy paths of GET , POST , PUT , (optionally) PATCH , and DELETE.

We’ll also be covering the unhappy paths. Error handling and display is just as important.

Where possible we’re going to try and use just one Behat feature file. It’s not always possible – the various implementations don’t always want to behave identically.

There’s a ton of good stuff covered in these videos. But the back end is only half the battle.

Whether you want to “catch them all”, or you’re working with a dedicated front-end dev, it’s definitely useful to know the basics of both.

With that in mind, you can pick and choose whether to implement the back-end, or front-end, or both.

If you don’t want to implement a back-end yourself, cloning any of the projects and getting an environment up and running is made as easy as possible by way of Docker. But you don’t need to use Docker. You can bring-your-own database, and do it that way, too.

The Front End

Whatever back end you decide to spin up, the front end should play nicely.

We’re going to implement a few different front-ends. The two I’m revealing today are:

  1. ‘raw’ JavaScript
  2. React

I have plans for a few others, but each implementation is a fair amount of work and I don’t want to over promise at this stage. There’s definitely at least two more coming, but let me first get these two on the site 🙂

The raw JavaScript approach aims to show how things were in the ‘bad old days‘. The days before your package manager  would take up ~7gb of your hard disk with its cache  directory.

The benefit of working this way is that there’s really no extra ‘stuff’ to get in the way. We can focus on making requests, and working with responses.

But that said, this is 2018 and the many modern JavaScript libraries and frameworks are fairly awesome. You’ll definitely get a renewed sense of appreciation for how much easier your life is once you’re comfortable using a library like React, after having done things the hard way.

Again, as mentioned we will cover more than just raw JS and React. Currently each implementation is between ten and fifteen videos. Each video takes a couple of hours to write up, and another couple of hours to record on average. I’m going as fast as I can, and will upload and publish as quickly as possible.

You can watch them as they drop right here.

Site Update
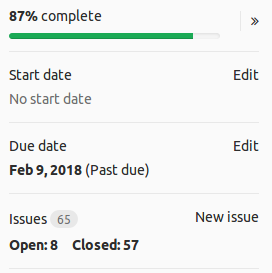
Behind the scenes over the past 10 weeks I have been working on integrating CodeReviewVideos with Braintree.

This is to enable support for PayPal.

I tried to create a ticket for everything I could think of ahead of starting development.

And I added a new ticket for any issue I hit during development. I’m not convinced I tracked absolutely everything, but even so I completely underestimated just how much work would be involved in this feature.

Being completely honest, I have never been more envious of Laravel’s Spark offering. For $99 they get Stripe and Braintree integration, and a whole bunch more. Staggering.

There’s a bunch of other new and interesting features in this release.

I’ve taken the opportunity to migrate from Symfony 3 to Symfony 4 for the API. There’s a bunch of new issues that arose during this transition – I hadn’t given it much prior thought, but with the new front controller (public/index.php) totally broke my Behat (app_acceptance.php) setup.

This work is also enabling the next major feature which I will start work on, once PayPal is live. More on that in my next update.

I appreciate that from the outside looking in, there doesn’t seem to have been a great deal of activity on the site over the last few weeks. I can assure you that behind the scenes, there has never been more activity.

Have A Great Weekend

Ok, that’s about it from me for the moment.

As ever, have a great weekend, and happy coding.

p. s. – I would be extremely grateful if you could help me spread the word by clicking here to tweet about the new course.