Symfony 3.3 Dependency Injection Example

Symfony 3.3 landed this week.

My most used addition so far has been the new Dependency Injection features.

Even though I’m not a huge fan of autowiring, I do very much like the new autoconfigure.

This is a cool new feature that allows the removal of tags from your service definitions.

Note that I use my services like this:

# app/config/config.yml

imports:
    - { resource: parameters.yml }
    - { resource: security.yml }
    - { resource: services/console_command.yml }
    - { resource: services/command_handler.yml }
    - { resource: services/event_listener.yml }
    - { resource: services/event_subscriber.yml }
    - { resource: services/factory.yml }
    - { resource: services/queue.yml }
    - { resource: services/repository.yml }

# Other typical Symfony config.yml stuff continues here

The important thing here is that stuff is split up.

What this means is that I could adopt the new approach in phases.

I started with the event_subscriber service list, simply because that was the next thing I needed to work on.

If you don’t have a decent set of tests covering your services – and breaking said services would render you jobless – then please add tests before doing this.

Here’s my services/event_subscriber.yml configuration before the change:

services:

    a6.event.subscriber.registration_mailing:
        class: AppBundle\Event\Subscriber\RegistrationMailingSubscriber
        arguments:
            - "@twig"
            - "@mailer"
            - "%support_email_address%"
            - "%fos_user_from_email_name%"
        tags:
            - { name: kernel.event_subscriber }

    a6.event.subscriber.visitor_support_request:
        class: AppBundle\Event\Subscriber\VisitorSupportRequestSubscriber
        arguments:
            - "@logger"
            - "@a6.mailer"
            - "@doctrine.orm.default_entity_manager"
        tags:
            - { name: kernel.event_subscriber }

    a6.event.subscriber.member_support_request:
        class: AppBundle\Event\Subscriber\MemberSupportRequestSubscriber
        arguments:
            - "@logger"
            - "@a6.mailer"
            - "@doctrine.orm.default_entity_manager"
        tags:
            - { name: kernel.event_subscriber }

And after:

services:
    _defaults:
        ####
        # all will be tagged:
        #         tags:
        #              - { name: kernel.event_subscriber }
        ####
        autoconfigure: true


    a6.event.subscriber.registration_mailing:
        class: AppBundle\Event\Subscriber\RegistrationMailingSubscriber
        arguments:
            - "@twig"
            - "@mailer"
            - "%support_email_address%"
            - "%fos_user_from_email_name%"

    a6.event.subscriber.visitor_support_request:
        class: AppBundle\Event\Subscriber\VisitorSupportRequestSubscriber
        arguments:
            - "@logger"
            - "@a6.mailer"
            - "@doctrine.orm.default_entity_manager"

    a6.event.subscriber.member_support_request:
        class: AppBundle\Event\Subscriber\MemberSupportRequestSubscriber
        arguments:
            - "@logger"
            - "@a6.mailer"
            - "@doctrine.orm.default_entity_manager"

That big comment wasn’t added for the sake of this post either. That is for real.

I like Symfony *because* it is explicit.

Other people, I know, prefer what I consider a more magical approach. I like magic in real life. In code, I appreciate magic, but I need to know what’s going on underneath before I feel comfortable using it.

If all my services were in one giant services.yml file, I would not use this approach. That’s my personal opinion anyway.

By the way, probably the most concise guide I have found on this topic has been “How to refactor to new Dependency Injection features in Symfony 3.3” by Tomáš Votruba.

Question Time

I would really appreciate it if you could hit reply, or leave a comment on the blog post to this one:

In a video tutorial series, do you care about seeing the Setup phase?

E.g. if the course was about using Symfony with Redis, how important is seeing Redis being setup and configured to you?

This would greatly help my video topics on a forthcoming course.

Thank you!

Video Update

This week there were 3 new videos added to the site.

https://codereviewvideos.com/course/let-s-build-a-wallpaper-website-in-symfony-3/video/wallpaper-setup-command-part-3-doing-it-with-style

Now that we have created a Symfony console command to find and import our wallpapers we are going to use Symfony’s console style guide to make it look nice.

https://codereviewvideos.com/course/let-s-build-a-wallpaper-website-in-symfony-3/video/doctrine-fixtures-part-1-setup-and-category-entity-creation

Lets add Doctrine Fixtures Bundle to our project to provide a starting point for our Wallpaper and Category data. This is both useful, and easy to do.

https://codereviewvideos.com/course/let-s-build-a-wallpaper-website-in-symfony-3/video/doctrine-fixtures-part-2-relating-wallpapers-with-categories

With our Wallpaper and Category entities in place we can go ahead and create some starting data for each. Beware a few gotchas which we cover in this video.

As ever, thank you very much for being a part of CodeReviewVideos.com, and have a great weekend.

Chris

Ship-shape and Bristol Fashion

There’s a phrase here in the UK:

Ship-shape and Bristol fashion

Meaning that everything should be in excellent working order.

The majority of this week has been getting two of my “legacy” projects into a shape I can ship.

Ship-shape, if you will.

There’s a fine line with side-projects, in my experience, between doing everything right, and getting things done.

Now, don’t get me wrong. If you cut corners, inevitably you will have to pay the price if the project is successful.

The reason I’m willing to cut a few corners on side-projects is that I have only a rough idea as to whether an idea will be successful or not.

Honestly, this is a whole different can of worms, the lid on which I wish to remain closed.

Just a few sentences ago I referred to my projects as “legacy”. These are very active projects, but up until very late last week, they had no tests.

I am unable to attribute this quote to anyone in particular, but I have heard it repeated by many:

Legacy code is any code without tests.

And I would have to agree. You just cannot be absolutely sure how code actually works unless it is tested.

Now, adding tests is good. I think the vast, vast majority will agree on this.

But what else can we add to make sure our code is – and importantly, remains – Ship-shape?

Security Advisories

I like the Roave team. They are good dudes. Also, they have a nice doggy logo.

I add their roave/security-advisories to every project I work with.

All you need to do is:

composer require roave/security-advisories:dev-master

And you’re using this package in your project.

So what does it do?

It stops you from accidentally installing any packages with known security vulnerabilities.

Very handy, and as it’s a one-liner, it’s a super simple, immediately beneficial addition to your project.

Symfony Security Check

Paranoid?

Not overly concerned about burning through a few extra CPU cycles?

Rather than just relying on the Roave team, I use a tool provided by the good folk at SensioLabs to double check my work.

Built into Symfony is the Security Checker, and with two new lines in composer.json I can check my deps again:

    "scripts": {
        "post-install-cmd": [
            "php bin/console security:check"
        ],
        "post-update-cmd": [
            "php bin/console security:check"
        ]
    },

I’ve removed the other stuff for brevity.

What I hope to see is something like this:

php bin/console security:check

Symfony Security Check Report
=============================

 // Checked file: /path/to/my/project/composer.lock

                                                                                                                        
 [OK] No packages have known vulnerabilities.                                                                           
                                                                                                                        

 ! [NOTE] This checker can only detect vulnerabilities that are referenced in the SensioLabs security advisories        
 !        database. Execute this command regularly to check the newly discovered vulnerabilities.

Phew.

Static Analysis

I use a small number of Static Analysis tools.

I’d like to use Phan but I have not yet successfully managed to get a run to pass.

I use a PHPStorm plugin – PHP Inspections EA Extended – to catch issues in real time as I code.

This is a really useful tool that offers a bunch of advice as I code – a bit like having a super knowledgeable PHP guru watching over my shoulder, only without the coffee breath.

This is a good start, but I also make use of two other tools.

PHP Mess Detector is a tool I’ve used for as long as I can remember. I use a very small rule subset, as I find it can be extremely noisy if I turn on too many checks.

My favourite part of PHPMD is the Cyclomatic Complexity test. With such a computer science textbook name, it might be one you overlook.

Code with a high Cyclomatic Complexity score indicates to me that I need to rethink my implementation. Usually this involves breaking down a bunch of if statements, or for loops until things become much more maintainable. This is one of those tasks that takes extra time now, but for which you are thankful to yourself later.

PHPStan was the tool I went with after I struggled to get Phan working.

Generally PHPStan finds a bunch of errors and mistakes I’ve made that are not immediately obvious. Stuff like using too many parameters on function calls, or using invalid typehints, missing constants… that sort of thing.

You might be thinking: How the heck do you miss a constant? And that’s a good call. However, in the early stages of a project where things are more fluxxy than Emmett Brown’s flux capacitor then these things do happen.

If you work in a team, having a few of these tools in place can ensure everyone is “singing from the same hymn sheet”. In other words, whilst everyone has their own style, the overall look and feel of the codebase should be to some standard guidelines.

PHPSpec

I use PHPSpec as a big part of my TDD workflow.

Typically I will write a Behat feature file first, as this gives me a high level overview of what needs to happen for this feature to be complete.

Once I have the failing feature file I can drill down into the individual scenario steps to make that feature pass.

Most often I work with JSON APIs, so the Behat scenario steps are largely already done. By which I mean most scenarios look something like this:

  Scenario: User can GET their personal data by their unique ID
    When I send a "GET" request to "/users/u1"
    Then the response code should be 200
     And the response header "Content-Type" should be equal to "application/json; charset=utf-8"
     And the response should contain json:
      """
      {
        "id": "u1",
        "email": "peter@test.com",
        "username": "peter"
      }
      """

The response (and POST body, not shown) are text entries so can change without having to write new step definitions.

How the response is created is where PHPSpec comes in.

Beyond the basics, a controller will hand off to one or more services which do the real work.

Those services are both written with the guidance of, and tested by PHPSpec.

PHPSpec is an unusual tool. It sells itself as a highly opinionated tool for helping shape the design of your code. If you are in agreement with the opinions it holds then there is no better tool for TDD in PHP, in my opinion.

That’s a lot of opinion 🙂

One of the advantages of switching to PHPSpec is that it steered me away from having unit tests that touched an actual database. This was something I used to do frequently, and would slow down my unit tests.

Anyway, the upshot of all of this is that I expect my entire unit test suite to complete well within 60 seconds, and more preferably within less than 20 seconds. This isn’t always the case, but it’s my target.

Behat

As mentioned, I use PHPSpec in conjunction with Behat.

Behat serves a dual purposes for me.

It is my greenlight for my project behaving as expected in as-close-to-real-world as it gets.

But equally as importantly, it is my living documentation.

I can refer back to any Behat scenario to understand how a particular endpoint is supposed to work. I can then either run that test individually, or pull out the relevant parts of the test and use it to make a manual request using Postman.

Even nicer is that if needed, I can refer other developers to the documentation to help them understand how the system should behave.

It’s not all roses though.

Unfortunately my Behat tests take a long time to run. By which I am talking between 3-10 minutes on most projects.

Whilst working on individual scenarios I use a lot of tagging to run only a subset of my overall test suite.

However, before I merge back to master, I want to make sure I haven’t inadvertently broken anything else. It’s surprising how often this happens.

That said, I don’t want to tie up my own computer running the full test suite every time I push some code. Not only is this a huge productivity killer, it’s also something I tend to forget to do.

Therefore it makes sense to offload this task to an army of mindless automatons. Or GitLab CI runners, to you and me.

If you’d like to see an example of a project that uses Behat and PHPSpec, I have code samples and a full course here.

Continuous Integration

In my experience, Continuous Integration has been a real pain to get setup.

I’m still not 100% happy with my setup. I guess it’s all about the gradual improvements.

If you’re unsure of what I mean by Continuous Integration – from here on referred to as CI – here is what I mean:

Throughout the day I work on my code.

Every time I make significant progress, I do some sort of git related task (commit, merge, etc), and then push the code up to my repository.

All my repositories live in GitLab.

Whenever a push occurs on a specific branch, a set of events take place. What these events are depends on the branch, or if the code was tagged, or a bunch of other variables that I (or you could) control.

I’m fairly lazy.

Running the tests locally is a blessing and a curse.

My unit tests take almost no time (seconds).

My acceptance tests take ages, by comparison (10+ minutes not unusual).

I want to run my acceptance tests as much as possible, but I often don’t want to interrupt my entire work process whilst they complete.

Now, with some judicious use of tagging, I can run specific Behat features or individual scenarios as needed. But when I push my code up to the server, I want every test to run.

And that’s what CI brings for me.

It spins up a full environment – using Docker compose – and then does a full build of my project (composer install, etc), checking the security advisories, running static analysis, and then running all the tests – both unit, and acceptance.

At each stage I want to fail fast.

If any of my “stages” fail then the whole build aborts.

It took me about 6 weeks of persistent struggle to get to this stage. But it’s awesome now it works.

These 6 weeks enable me to be lazy. I can rest assured that even if I don’t do a full test run before committing, the GitLab runner will make sure the full test run occurs anyway.

And then I get a variety of alerts (and a failed build) if they do not pass.

The upshot of this is that I use the outcomes of these builds as my deployable Docker images.

If the build fails, I am completely unable to deploy this code.

It is not Ship-shape.

That’s my process, I’d love to hear about yours. I’m also open to any suggestions / feedback on what I have, so please do hit reply and let me know.

Video Update

This week saw three new videos added to the site.

https://codereviewvideos.com/course/let-s-build-a-wallpaper-website-in-symfony-3/video/creating-our-wallpaper-entity

In this video we are going to start working with the database. We will create our first entity, allowing us to start saving Wallpapers to our database.

https://codereviewvideos.com/course/let-s-build-a-wallpaper-website-in-symfony-3/video/wallpaper-setup-command-part-1-symfony-commands-as-a-service

In this video you will learn how to generate a Symfony Console Command, and then how to set this Symfony Console Command as a Symfony Service.

https://codereviewvideos.com/course/let-s-build-a-wallpaper-website-in-symfony-3/video/wallpaper-setup-command-part-2-injection-is-easy

Learn how easy it is to inject parameters and Symfony services into your Console Commands. Also, learn about Symfony 3’s new kernel.project_dir  parameter.

If continuous integration isn’t your bag, I’d really appreciate it if you could hit reply right now and let me know the biggest problem you’re having whilst learning Symfony.

As ever, thank you very much for reading.

Have a great weekend, and happy coding.

Chris
New This Week: Site Search

The big news this week is that I have – finally – added a Search facility to the site. There were a few other improvements and changes that went into this release, but this was the biggy.

I’m going to be completely honest here: I’m using my third choice for the search implementation.

It’s taken me ages to do this because I wanted to use Elasticsearch. I’ve got previous experience with Elasticsearch and it is, honestly, awesome.

However, deploying Elasticsearch isn’t straightforward. There are some security implications (as is to be expected), and as ever with a “free” solution, a bunch of admin tasks to add to my plate.

I wasn’t overly bothered about any of this though. What bothered me was that whenever I ran my Ansible role to deploy the Elasticsearch stack, the whole thing fell over. Fortunately this was in dev, and I could revert to my VM snapshot, try a few tweaks, and try to deploy again. After a bunch of failed attempts I got really paranoid about trying this against my production box, and so, site search got put onto the backlog.

On a weekly basis I would get at least one, often several emails asking why there was no site search facility. It hurt to receive those emails. Each one served as a reminder of my failure to implement.

Now, for those who don’t know, I am currently revamping the entire back end from the current approach (all Symfony / Twig) to be Symfony as an API, and React on the front end. It’s going ok, but slower than I envisaged. The main reason for this is my prioritisation – I choose to prioritise recording / editing / writing up new content over improving the site itself.

With this in mind, I’d love to hear your opinion on this. Would you prefer I continue prioritising new video content, or switch focus for a few weeks to improve the site and get the new version launched?

Anyway, with deploying Elasticsearch proving problematic, as mentioned I had put search onto the backlog.

Then quite recently I was browsing Symfony.com and noticed they use Algolia. Given that the good people of SensioLabs are likely to know a thing or two about running search for traffic (at least) an order of magnitude greater than what CodeReviewVideos needs to handle, I figured I would check Algolia out as a potential solution.

My first stop was to Packagist. Sure enough, there’s a Bundle – AlgoliaSearchBundle – that pretty much gets you up and running with very little effort. I just needed to add the bundle, enable it, and annotate the entities I wanted to be searchable.

Here I hit upon a problem.

To separate between Free and Members Only episodes, I have used Single Table Inheritance.

This works really well. However, Algolia would only allow me to create an index per entity. From Algolia’s point of view, a Free tutorial is different to a Members Only tutorial, and therefore my search results were… weird.

I thought I could be smart about it and merge the two, but there was no apparent way to access the ‘score’ from the returned array of results, so merging would either be extremely naive or very flawed.

That led to me ditching Algolia.

I would say however, if you have a setup without my interesting design choices (ahem) then Algolia’s results were great. Well worth a look. Though, potentially, a little pricey.

Feeling a little dejected, but not yet ready to give up, I remembered back to days gone by. Long before I had ever heard of Elasticsearch or Apache Solr, I would simply use MySQL’s FULLTEXT indexing to offer a search facility.

With a little coaxing (and help from this StackOverflow post) I had a working solution up and running in an embarrassingly short amount of time. I say I was embarrassed because if I had gone with this solution originally, instead of trying to be “perfect” then I could have had this online shortly after CodeReviewVideos launched over two years ago.

BRB, shaking the Shame Bell.

Anyway, it’s there now. So that’s good.

The results are not quite as refined as if I were using a more robust solution, but it’s better than nothing. Hopefully you agree.

Battle of the Admin Bundles

Infrequently I get asked if I have any video content or tutorials for Sonata Admin Bundle.

The answer as it stands currently is: no.

The reasoning for this is that the last time I tried Sonata Admin Bundle I found it overly complex for my needs. I could use Symfony’s CRUD generators to get most of the functionality I needed for a simple back end, without the overhead of an extra bundle, and learning all about that bundle to boot.

That said, the last time I tried Sonata Admin Bundle was at least two years ago. Times may have changed.

For a recent video series I did want a ready made Admin panel. I’d heard a bunch of good things about EasyAdminBundle, and have been super impressed with it so far. A huge thanks to Javier Eguiluz (in general) and all the contributors for this one, as it is great.

I’m curious though. Would a Sonata Admin Bundle tutorial series be something you’d like to see? I’m happy to do a course on this if there is enough demand. I would really appreciate it if you could please hit reply and let me know your thoughts.

Video Update

Aside from the tweaks and new features, this week saw 3 new videos added to the site.

https://codereviewvideos.com/course/let-s-build-a-wallpaper-website-in-symfony-3/video/pagination

In this video we will add the ability to Paginate over multiple pages of Wallpapers / Desktop Backgrounds, making use of KnpPaginatorBundle along the way.

https://codereviewvideos.com/course/let-s-build-a-wallpaper-website-in-symfony-3/video/adding-a-detail-view

Probably the easiest video tutorial in the entire series – in this one we simply add a Detail View where a user can download the full sized wallpaper.

https://codereviewvideos.com/course/let-s-build-a-wallpaper-website-in-symfony-3/video/creating-a-home-page

In this video we create a home page for our site, displaying 8 random wallpapers, and then 2 of the “top” wallpapers from each of our categories.

I’d really appreciate any feedback you have on this series.

I also blogged this week. As a heads up, if you are migrating to SwiftMailer version 6 any time soon, be aware of a potential problem you may encounter:

How I Fixed: Swift_Message::newInstance() not found

Before I go, can I also ask that when logged in, have you experienced a problem with being timed out / logged out after watching videos on the site?

I get infrequent reports of this problem, and I cannot reproduce it. I’d be interested to know if you’ve been affected by this?

I’d also like to apologise to anyone who has left a blog comment to which it took me a few days to reply. If you have left a blog comment before, WordPress was kindly auto-accepting the comment but not informing me of new comments. The upshot being that I was missing a bunch of new comments without realising it.

I have switched to “all comments need moderation” now, which although feels like a step backwards, at least means I won’t miss anything. I hope!

As ever, thank you very much for reading and being a part of CodeReviewVideos. I really appreciate it.

Have a great and sunny weekend, and happy coding.

Chris

How I Fixed: \Swift_Message::newInstance() not found

I had a recent requirement to overwrite the Mailer  class provided as part of FOSUserBundle.

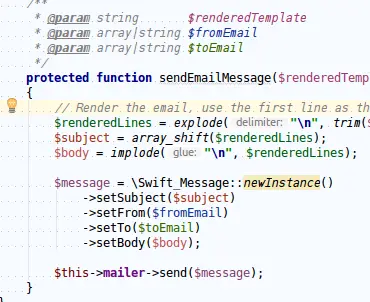
There’s a protected method in this class as follows:

    /**
     * @param string       $renderedTemplate
     * @param array|string $fromEmail
     * @param array|string $toEmail
     */
    protected function sendEmailMessage($renderedTemplate, $fromEmail, $toEmail)
    {
        // Render the email, use the first line as the subject, and the rest as the body
        $renderedLines = explode("\n", trim($renderedTemplate));
        $subject = array_shift($renderedLines);
        $body = implode("\n", $renderedLines);

        $message = \Swift_Message::newInstance()
            ->setSubject($subject)
            ->setFrom($fromEmail)
            ->setTo($toEmail)
            ->setBody($body);

        $this->mailer->send($message);
    }

Seems fairly straightforward.

Notice that PhpStorm sees nothing wrong with this method:

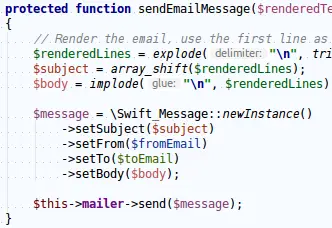
Being the lazy dev, I started by copy / pasting the entire contents of this class to form the basis of my own Mailer  implementation. Cue confusion:

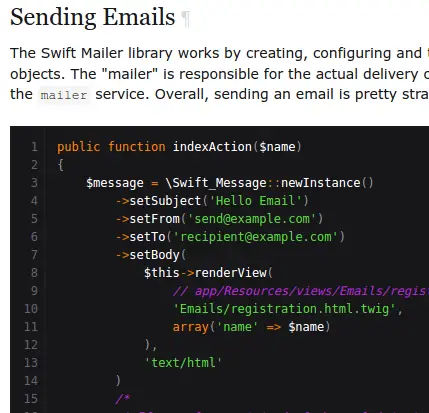
I’ve used this \Swift_Message::newInstance()  code before, so I know it works. A quick check of the Symfony docs, and the SwiftMailer docs both seemed to confirm that what I was trying to do was correct:

(I checked the docs for Symfony 3.2, 3.3, and 3.4)

I thought it was just PhpStorm being a bit weird, but then I ran my code and saw things like this:

Attempted to call an undefined method named “newInstance” of class “Swift_Message”.

Diving through the code did indeed seem to show no references to newInstance .

Quite odd.

Anyway, sending an email – whilst important – wasn’t super urgent, so I commented out the code and added it to my GitLab issues list.

Whilst browsing Twitter later that evening I noticed:

I then remembered that being hasty to try new and shiny things was probably the cause of my problems.

Sure enough it turned out I’m using dev-master of SwiftMailer in my project. A quick glance of the changelog:

6.0.0 (2017-05-19)
------------------

 * added Swift_Transport::ping()
 * removed Swift_Mime_HeaderFactory, Swift_Mime_HeaderSet, Swift_Mime_Message, Swift_Mime_MimeEntity,
   and Swift_Mime_ParameterizedHeader interfaces
 * removed Swift_MailTransport and Swift_Transport_MailTransport
 * removed Swift_Encoding
 * removed the Swift_Transport_MailInvoker interface and Swift_Transport_SimpleMailInvoker class
 * removed the Swift_SignedMessage class
 * removed newInstance() methods everywhere
 * methods operating on Date header now use DateTimeImmutable object instead of Unix timestamp;
   Swift_Mime_Headers_DateHeader::getTimestamp()/setTimestamp() renamed to getDateTime()/setDateTime()
 * bumped minimum version to PHP 7.0

This looks like the culprit:

removed newInstance() methods everywhere

Fixing this is really simple:

$message = \Swift_Message::newInstance()
    ->setSubject('My important message subject')
    ->setFrom($this->supportEmail)
    ->setTo($user->getEmailCanonical())
    ->setBody($body, 'text/html')
;

becomes:

$message = (new \Swift_Message('My important subject here'))
    ->setFrom($this->mailingFromAddress, $this->mailingFromName)
    ->setTo($user->getEmailCanonical())
    ->setBody($body, 'text/html')
;

And as is often the case, when the provided objects / methods are used properly, things do work 🙂

Update – There is already an open PR to fix this in the docs: https://github.com/swiftmailer/swiftmailer/issues/925

My Video Tutorial Recording Process

I was recently asked to describe the workflow I use when preparing my tutorial videos. This included the software I use, and whether I create a script ahead of time.

The truth is: I don’t have a definitive process for each video.

I do have a foundation I work from. This starts with the hardware I use, which is always the same for every video.

The Hardware I Use

Probably the most important piece of equipment I use is a Heil PR-40 microphone.

I confess to knowing next to nothing about microphones. I bought the one that I saw recommended by Cliff Ravenscraft – the Podcast Answer Man.

I bought the microphone, a boom arm, a pop filter, and the matching shock mount for $774 which at the time seemed like extremely good value as the pound / dollar was favourable. Also, none of this kit was available in the UK. This was about 8 years ago.

For clarity:

  • Boom arm – the thing that allows me to move the microphone freely around the desk.
  • Pop filter – stops plosive sounds: ‘p’, ‘t’, ‘k’, ‘d’, ‘g’, and ‘b’ from sounding nasty.
  • Shock mount – acts as a cradle for the boom arm, and stops accidental noise from me knocking the desk when recording.

Anyway, I ordered it all and then FedEx sent me a friendly note that I was going to be stung for a large amount of cash in import duty. That sucked. I can’t remember exactly how much that cost me, but it was a slap in the face on top of the $169 I was already paying for shipping. Hey ho.

All of this clobber is connected to a Mackie VLZ3 mixer. I forget how much this cost, but it was found via eBay if I recall. I think this is no longer in production, and have no idea what the equivalent replacement would be.

An assortment of cables are required to make this setup work. I needed an XLR cable to go from the mic into the mixer, and then an RCA phone to phone cable (hope that’s correct) to go from the mixer to my soundcard.

Originally I had a fancy soundcard in my desktop PC which did a good job. And originally I recorded everything on my desktop.

However, when travelling up and down the country on work I couldn’t reasonably lug my desktop around, but I did have a laptop – a MacBook Pro – with me.

I found a Numark USB adapter which allowed me to go from the mixer to the USB widget thing, which then plugged into the Macbook via USB. Still lots of stuff to lug around, but better than a desktop 🙂

The truth is the hardware is an expensive up front cost. My idea when buying the microphone was to start a podcast. I did, it was quite successful (~20,000 downloads an episode, which to me was a much great success than I had imagined), but I never truly enjoyed podcasting.

Having spent so much of my money on all this kit, I was reluctant to shove it all in a box and be done with it. I decided I would try creating some programming tutorials and put them up on YouTube.

That was the start of the process that ultimately led to where I am and what I do today.

The Software I Use

To begin with, when on the desktop, I used Windows 7.

I would use Camtasia for recording both screen and voice. It worked well. Being on the desktop meant rendering was also fairly fast.

I also toyed with Dragon Dictate for dictation which worked really well for voice-blogging more general content, but less well for technical posts.

Dragon Dictate has something that other programs I tried did not – a way of training the voice recognition system how to understand my accent. Recently I’ve tried Google Dictate which is still nowhere near as good.

Switching to the Mac, I opted for Screenflow for video, and tried their Dictation app as an alternative for Dragon Dictate. Unfortunately this has been truly disappointing even compared to Google Dictate.

I rarely do any dictation work as of late. There is little time saving to be done.

I generally set the screen recording and run until I’m done. I don’t stop unless forced to do so. This generally means that what you see on the screen happened that way in real life. I prefer this, as showing an edited ‘perfect’ scenario is not how real development works. At least, not for me.

I don’t make a script.

Typically I make a prototype of the finished project ahead of time, and then use a combination of git branches and tags to go over when actually recording the videos.

All videos are filmed at 1280×720 pixel resolution. For this I use a utility for the Mac called RDM. I have a separate user profile for CodeReviewVideos which keeps the environment clean and free of my day to day laptop use.

That said, I don’t use OSX as my primary desktop outside of CodeReviewVideos. I use Ubuntu Linux for my dev work. I have never tried recording screencasts from Ubuntu so have no experience in this area. I’m greatly looking forwards to Ubuntu adopting Gnome as the primary desktop environment.

I bump up the font size in the terminal by at least 4x. There’s nothing worse than tiny text, or having to watch brilliant content that was unfortunately filmed in 4k, but you’re watching it on your mobile phone screen :/

I do use post-production techniques inside Screenflow to cut out the gaps, and fast forward any slow parts. I’m getting better at not saying “uhm”, and “err” quite so much now.

I would estimate recording a 5 minute video segment takes ~30-60 minutes of footage before editing.

The editing process takes ~1-2 hours per video.

Rendering, unfortunately, is a relatively slow process being on the laptop. Each video takes 10-20 minutes to render. Uploading takes another ~5 minutes per video.

I write up each of the videos using Sublime Text 3, with the Google Spell Checker plugin regularly saving my bacon.

Writing up the videos takes another ~2 hours per video.

I’m constantly trying new things when recording. I try to make the best use of my recording time by limiting myself to a set amount of hours per week. This forces me to focus down and create content.

My mantra has been to buy the best piece of kit I can afford and hopefully, that means I only ever need to buy it once and use forever.

I’d love to answer any questions that you may have – so feel free to fire them over. I’m really not an audio nut by any means.

Video Update

This week there have been three new videos added to the site.

https://codereviewvideos.com/course/symfony-3-for-beginners/video/the-fat-controller

First up we finished the “Symfony 3 For Beginners” course with an opinionated video on why I don’t like the typical PHP-framework way of dealing with POST in controller actions.

I’d love to get your opinion on this.

https://codereviewvideos.com/course/let-s-build-a-wallpaper-website-in-symfony-3/video/introduction-and-site-demo

Next, we start a new series.

In this series we are going to build a Wallpaper or Desktop Background website from scratch.

I know, I know, these wallpaper websites aren’t quite as cool as they were about 10 years ago. But they do make an excellent topic for a tutorial series.

There’s a bunch of topics being covered in this series:

  • Controllers, routing, and Twig
  • Doctrine queries, results, and repositories
  • Pagination
  • Creating console commands
  • Forms, file uploads, and form theming
  • EasyAdminBundle
  • Event Listeners
  • Symfony Services
  • Bootstrap 3

The idea here, by the way, is that this follows on nicely from the “Symfony 3 For Beginners” course we’ve just finished.

You could, without much effort, adapt this idea to make a bunch of different types of sites.

If you’re that way inclined, you could even find ways to monetise a site like this with Google Adsense or similar. I’ve found a little extra beer money coming in from a website spurs me on to build it up further, and that has only benefited my programming skills, not to mention additional confidence in having seen a site through from concept to production.

This series is going to be split into three parts.

In this first part we build out the MVP (minimal viable product). This is the bare bones site that is “good enough” to launch.

Next, we will improve the site by covering things that need to be done once the site goes into a real world environment.

Finally, we’re going to re-do the whole thing using TDD. Seems a bit backwards in a way, but in my opinion, learning TDD is much easier this way. Stay tuned for more info on this one.

I’m not linking to the final video from this week as it’s a follow on from the one above.

Lastly, no, I haven’t forgotten about the Deploying with Docker course. I’m putting this one through the in-house assault course (i.e. I’m dogfooding this) before I put it out there. It’s working well so far, but it’s not quite there just yet.

Thanks for reading, have a great weekend, and as ever, happy coding.

Chris