
I made a previous post about how you can use a couple of actions built into Google Sheets to help you delete empty rows for a given column.
In that post I got a comment asking if it’s possible to automate the deletion in some way.
It is. And to do that, one way would be to make use of Google App Scripts.
What I’m about to share isn’t perfect, but it’s a start.
Starting Data
For this example we will begin with the following spreadsheet:

This is a standard, plain old Google Sheet with some test data thrown in.
What we want to happen here is:
- We create some magic code
- We run the magic code
- We end up with all the empty lines and duplicates rows magically deleted.
What We Are Creating
We’re going to create a couple of JavaScript functions that combine to make up a Google App Script that will add a menu to our spreadsheet, with one option, that when clicked will ask us for a column letter.

You can call this anything you like. My naming is for demo purposes.
When you click “Chris Helper” you will get a pop up:

It’s literally follow the prompt.
Just type in a letter for the column with your data.
I would type in “B” for the data set above.

Bonza.
The magic code (we will create below) runs, and our data is cleansed.
Creating Your First Google App Script
In order to do this, we will make use of Google App Scripts.
Google App Scripts is a scripting platform that allows users to automate tasks within Google Apps such as Gmail, Google Sheets, and Google Drive.
It uses JavaScript as the scripting language and provides an API for interacting with the various services. Users can create scripts to automate tasks, add custom functionality to apps, and interact with other Google services.
It is a powerful tool that can save time and increase productivity for users of Google Apps.
We will now walk through the steps needed to get the above working.
Begin by creating some duplicate data in a new Google Sheet. Here’s the test data I used above for those of you who are super lazy:
aaa
bbb
ccc


aaa
aaa
ddd
eee
fff
ggg
111


333
aaa

aaa
xyz
444
222
111
aaa
Once you have that copy / pasted into a new Sheet, go to Extensions > App Scripts

That pops up a new tab.

We will replace everything in the code editor pane with the following:
function onOpen() {
  const ui = SpreadsheetApp.getUi();
  ui.createMenu('My Custom Menu')
      .addItem('Chris Helper', 'removeDuplicatesAndEmpties')
      .addToUi();
}

function removeDuplicatesAndEmpties() {
  // Get the column to check for duplicates and empties from user input
  const columnToCheck = Browser.inputBox(
    "Please enter the column to remove duplicates and empties from (e.g. A, B, C):"
  );

  // Get the active sheet
  const sheet = SpreadsheetApp.getActiveSheet();

  // Convert the column letter to a number
  const columnNumber = sheet.getRange(columnToCheck + "1").getColumn();
  Logger.log(columnNumber);

  // Get the data range of the column to check
  const dataRange = sheet.getRange(1, columnNumber, sheet.getLastRow(), 1);
  Logger.log(dataRange);

  // Get the values of the data range
  const data = dataRange.getValues();
  Logger.log(data);

  // Create a new array to store the unique values
  const uniqueData = data
    .flat()
    .filter((value, index, arr) => value !== "" && arr.indexOf(value) === index)
    .map((item) => [item]);
  Logger.log(uniqueData);

  // Clear the original data range
  dataRange.clear();

  const newDataRange = sheet.getRange(1, columnNumber, uniqueData.length, 1);
  // Write the unique values back to the original data range
  newDataRange.setValues(uniqueData);
}Code language: JavaScript (javascript)
OK, so there’s a lot going on here, though hopefully the comments do explain most of the easier lines.
If you’re interested, we will cover the code in more depth below. For now, we will continue on.
Save the file, and you should then see that your individual functions are available to be run:

Select the removeDuplicatesAndEmpties function and then click Run.
You will be prompted for Authorization:

Click Review permissions.
Select your Google account in the pop up window.

A scary warning will pop up:

As you blindly copy / pasted this code from the internet, now might be the time to skip ahead and read up on exactly what that code is doing.
But if you are a trusting sole, you can click Advanced then Go to Untitled project (unsafe)

You should then see yet another pop up. Google do like showing you a pop up or 12.

Click Allow.
You should now be back in the Google App Scripts editor, and not much seems to have happened.
Switch back to your Google Sheets tab, the one with the data in it. You should now see a pop up:

Our column here is column D.
Yours will be whatever column your data is in.
Type in the letter, press OK, and your data should be cleaned up for you.
There are definitely ways this could be improved. One annoyance is that it moves all the data to the top of the column. But for a starting point, it does the job and introduces you to Google App Scripts.
Deploy The App Script
We ran the function directly from the Google App Script editor. But for our menu to show up, even when we haven’t opened the App Scripts panel, we need to deploy our App Script.
Click the big blue Deploy button on the top right:

You will see a pop up, so select New deployment:

We will get another new pop up:

There are several types of deployment in Google Apps Script, each with a specific use case:
- Web App: A web app deployment allows you to run your script as a web application. It can be executed by anyone who has the URL, and you can also specify who has access to the app by setting access permissions.
- API Executable: This deployment type allows external applications to call the script function as a web service. This can be used to expose the functionality of the script to external services, and it is useful for building integrations with other systems.
- Add-on: Google Workspace Add-ons are scripts that can be installed in Google Workspace applications like Sheets, Docs, and Forms. They add custom functionality to the application and can be used by any user who has access to the application.
- Library: A Library deployment allows you to share common code across multiple scripts. A Library is a script that contains functions and variables that can be used by other scripts. When you deploy a script as a Library, it can be used by other scripts that are associated with the same Google Workspace project.
We’re going to go with with Web App.
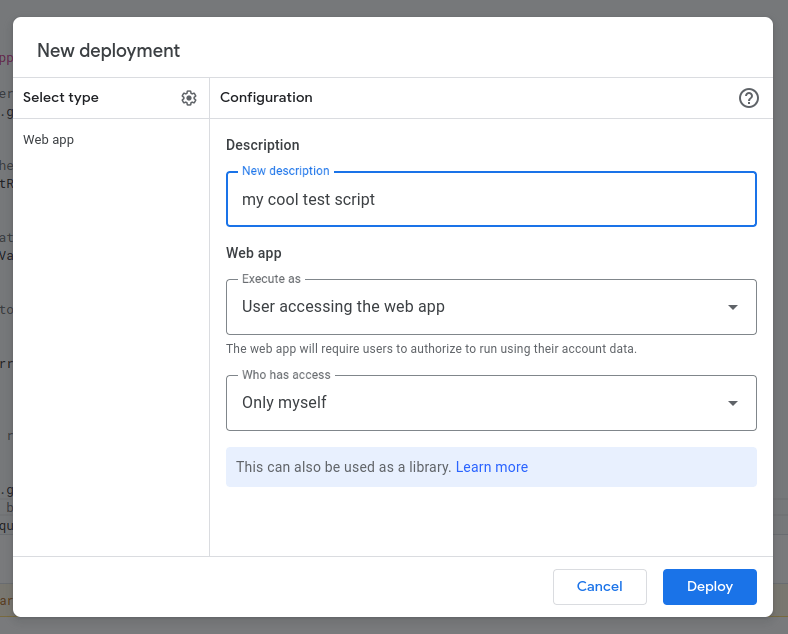
I’ve changed the Execute as drop down, and the description. You can keep the defaults though.
Your app should then be deployed:

Click Done.
Go back to your Spreadsheet.
Huh?
Nothing shows.
OK, make sure to refresh the page. This will close the Google App Scripts tab automatically.
After the spreadsheet reloads, wait ~5 seconds. You should then see your custom menu:

OK, into the code.
Code Deep Dive
Working with Google App Scripts is a lot like working directly inside the Amazon AWS Lambda code editor. It works fine, but it’s really rudimentary when compared to a proper IDE experience.
It’s outside the scope of this post, but if you’re doing anything serious with Google App Scripts, check out this guide for a way to use TypeScript with Google App Scripts to make your life a lot less stressful.
OK, so to recap, the code we have is as follows:
function onOpen() {
  const ui = SpreadsheetApp.getUi();
  ui.createMenu('My Custom Menu')
      .addItem('Chris Helper', 'removeDuplicatesAndEmpties')
      .addToUi();
}

function removeDuplicatesAndEmpties() {
  // Get the column to check for duplicates and empties from user input
  const columnToCheck = Browser.inputBox(
    "Please enter the column to remove duplicates and empties from (e.g. A, B, C):"
  );

  // Get the active sheet
  const sheet = SpreadsheetApp.getActiveSheet();

  // Convert the column letter to a number
  const columnNumber = sheet.getRange(columnToCheck + "1").getColumn();
  Logger.log(columnNumber);

  // Get the data range of the column to check
  const dataRange = sheet.getRange(1, columnNumber, sheet.getLastRow(), 1);
  Logger.log(dataRange);

  // Get the values of the data range
  const data = dataRange.getValues();
  Logger.log(data);

  // Create a new array to store the unique values
  const uniqueData = data
    .flat()
    .filter((value, index, arr) => value !== "" && arr.indexOf(value) === index)
    .map((item) => [item]);
  Logger.log(uniqueData);

  // Clear the original data range
  dataRange.clear();

  const newDataRange = sheet.getRange(1, columnNumber, uniqueData.length, 1);
  // Write the unique values back to the original data range
  newDataRange.setValues(uniqueData);
}
Code language: JavaScript (javascript)
There are two functions. One is significantly simpler than the other.
Let’s start with the simpler one.
onOpen
I did not just choose the function name of onOpen at random. It is a reserved function name.
What this means is, whatever actually runs our userland code behind the scenes, that code will try to call certain functions at specific points, if they are defined.
In our case we have defined onOpen, and in there, as the name implies, this function’s code will be run whenever our spreadsheet (or doc, etc) is opened.
We use this function to add a menu to our Spreadsheet.
That code is hopefully fairly intuitive. See the docs if not.
The one quirk is that in .addItem('Chris Helper', 'removeDuplicatesAndEmpties'), we name our menu item (technically called the caption), and define the function name. Only we specify the function name before we have provided the function.
So really these two functions should be the other way round – but it makes no difference in the real world.
removeDuplicatesAndEmpties
I suspect the first two lines are fairly well commented:
  const columnToCheck = Browser.inputBox(
    "Please enter the column to remove duplicates and empties from (e.g. A, B, C):"
  );

  // Get the active sheet
  const sheet = SpreadsheetApp.getActiveSheet();Code language: JavaScript (javascript)
There’s not a lot to explain there. We make use of the methods that Google provides. The docs give more, if needed.
  // Convert the column letter to a number
  const columnNumber = sheet.getRange(columnToCheck + "1").getColumn();Code language: JavaScript (javascript)
Then we use the sheet.getRange() method, which is used to specify a range of cells in the sheet. The first argument passed to this method is the columnToCheck variable from above, which is the column letter entered by the user, concatenated with the string “1”. This creates a range that starts at the top of the specified column, for example “A1” if the user entered “A” as the column.
The .getColumn() method is then called on this range, which returns the column number of the range, starting from 1. For example, if the user entered “A” as the column, the method would return 1, as column “A” is the first column in the sheet.
A brief look at Logger
Debugging by dumping. The JavaScript way. Not my favourite approach, and this Logger.log function is more restrictive than the plain console.log approach we would normally use.
The one gotcha with the Logger.log is that you can only pass one variable in at once.
So if you want to show what the variable is, you need two log statements:
Logger.log('columnNumber'); // a string - can be anything, but helpful if it's the var you're logging
Logger.log(columnNumber); // the actual variable valueCode language: JavaScript (javascript)
Not ideal.
But it works and logs out some stuff in the Execution Log:

Back To The Code
On we go, with the next line being:
  // Get the data range of the column to check
  const dataRange = sheet.getRange(1, columnNumber, sheet.getLastRow(), 1);Code language: JavaScript (javascript)
We use the getRange method to retrieve the range of cells in the sheet that contains the data for the specified column.
- The first argument:
1refers to the first row of the range. - The second argument:
columnNumberis the number of the column to retrieve data from. - The third argument:
sheet.getLastRow()is a method that returns the number of the last row that contains data in the sheet. - The fourth argument: also
1refers to the number of columns in the range.
Working with ranges is a bit fiddly. That’s where your Logger.log statements are going to come in very handy.
All we have done here is define a range that we are interested in. We haven’t, yet, done anything with that range directly.
  // Get the values of the data range
  const data = dataRange.getValues();Code language: JavaScript (javascript)
Now we have retrieved any data within that range.
Given that we are working with one column, we should get back an array which contains lots of individual arrays.
Our range specified one column, so one outer array.
Then our range specified all the rows in that range, up to the last value found that contains data. Depending on where you pasted your sample duplicate data in, depends on how many empty arrays you will see before your actually interesting data:
So we log out 42 empty nested arrays because our sample data is first found on line 43:
Again, that is the fiddly bit with working with these spreadsheets. You’re seeing one visual representation, but in code it will be nested or 2D arrays.
Now the main transformation:
  // Create a new array to store the unique values
  const uniqueData = data
    .flat()
    .filter((value, index, arr) => value !== "" && arr.indexOf(value) === index)
    .map((item) => [item]);Code language: JavaScript (javascript)
These four lines of code are really one chained statement / one line, split for readability.
Here we are creating a new array called uniqueData that contains unique values from the data array we got above.
data.flat() is flattening the array of arrays to a single array.
filter((value, index, arr) => value !== "" && arr.indexOf(value) === index) is a filter function that checks each value in the array and only includes it in the new array if it meets two conditions:
- it is not an empty string (
value !== "") - it is the first occurrence of the value in the array (
arr.indexOf(value) === index)
At this point we should have all the unique values. But we need to format them back to the nested array format that Google App Scripts sheets API expects:
map((item) => [item]) is a map function that wraps each item in an array before adding it to the new array.
  // Clear the original data range
  dataRange.clear();Code language: JavaScript (javascript)
This is a bit of a hack.
All we do here is wipe the column entirely. You may / likely will want something else. But for my purposes (I usually copy the messy data to a blank column for this process), this does just fine.
const newDataRange = sheet.getRange(1, columnNumber, uniqueData.length, 1);Code language: JavaScript (javascript)We just wiped out the entire column.
But now we need to put back in some data into that column. Again, we will need to work with a Range.
The getRange function takes the same arguments as before.
- The first argument
1refers to the first row of the range. - The second argument
columnNumberis the number of the column to update.
Things change though for the third argument:
- The third argument
uniqueData.lengthis the number of unique data items.
Previously we used sheet.getLastRow() to return the number of the last row that contains data.
Now though, we know the length of our data so we can use that as our end point.
Finally, the fourth argument 1 refers to the number of columns in the range. Same as before.
All we need to do now is actually write data to that new Range:
  // Write the unique values back to the original data range
  newDataRange.setValues(uniqueData);Code language: JavaScript (javascript)
So that’s us done.