What I wanted was to connect from Ubuntu (currently Ubuntu 22.x but that doesn’t matter because this worked on earlier versions), over to my Macbook running Ventura 13.2.1 – but again this works for earlier versions.
There’s two sides to this. You will need to configure Remmina on your Linux machine. And you will need to configure your OSX user account(s) to allow remote login from Ubuntu.
We will start with the OSX side.
Configuring OSX To Allow Remote Connections Via Remmina / VNC
Your best bet is to do this from the laptop (or desktop) itself.
You will need admin account credentials on that machine.
I am assuming you have a user you wish to set this up for. This could be your main user account (probably already the system admin), or a new one you created for this purpose. The process is the same.
Log in to your Mac and click the Apple icon in the top left, then System Settings…

In the Systems Settings menu, select General on the left, which should then bring up the main panel below.
From there, click Sharing:

This brings up the most important panel of the whole process.
You will need to edit both Screen Sharing and Remote Login.
The process for both is identical, but you do need to do both. At least, I did.
For each one, click the toggle to turn the option to On.
Then click the (i) icon next to each. Not very intuitive.

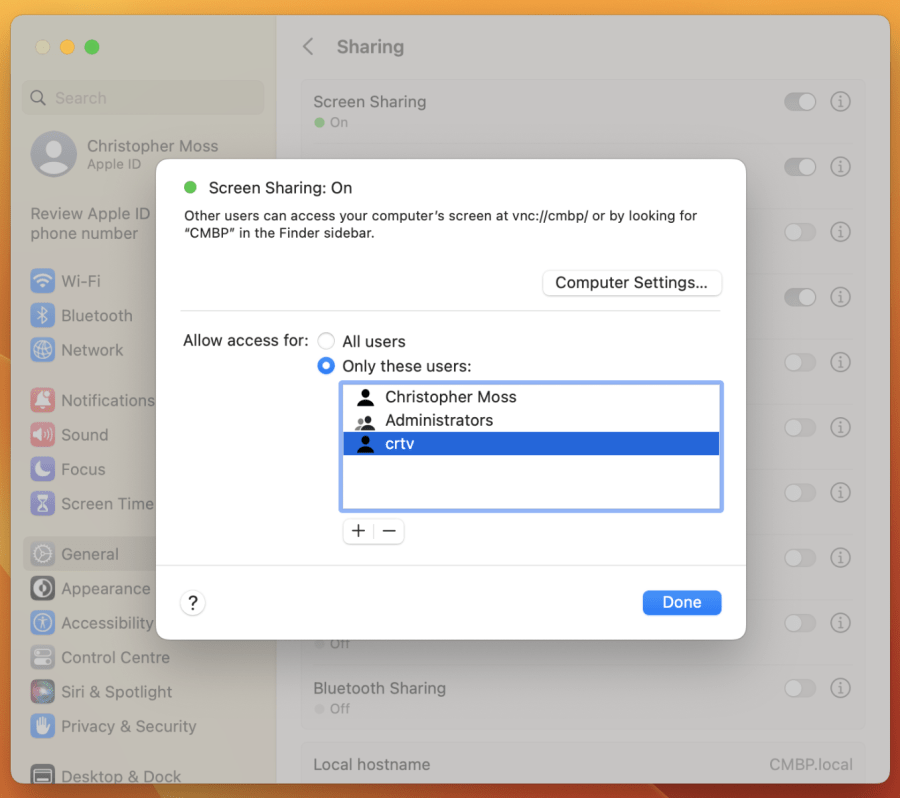
On the next menu, click the + button below the Allow access for: menu.
Select your username(s) that you want to allow to connect from Ubuntu.

When clicking the + icon you will see another menu like this one below. This should list all your usernames and any user groups you have configured.
I’ve blanked out my usernames as they are a little “give away” as to the company I was working for.

After highlighting your user and clicking Select (above), you should see the updated list of users below:
Repeat this exact same process for the Remote Login option also.

That’s us done for OSX setup. Over to Ubuntu.
Configuring Ubuntu For Remote Connection via Remmina / VNC to OSX
All the hard work was done on the OSX side.
You will need a VNC client to actually connect. If you don’t have it, it’s an easy install:
sudo apt-get install remminaCode language: JavaScript (javascript)Open Remmina and then click the little file icon in the top left. These icons aren’t very intuitive at all, are they?

Configuring the actual Remmina connection settings is easy – just one panel.
You will need to know your local OSX IP address. If you don’t know that, scroll down below for how to find it.
You will need to put in the exact username of your OSX user account. And the password, obvs.
The other thing I heard is you need to put the Colour Depth up to True Colour, or it won’t connect. I choose Best Quality also, as I am working on a LAN, so why not? If you’re on a crappy remote network, maybe drop this? Up to you.

Save it, then connect, and you should see yourself logged in to your OSX user profile:

How To Find Your Local IP Address on OSX
To get the IP address of your macOS machine, you can follow these steps:
- Click on the Apple menu in the top-left corner of your screen.
- Click on “System Preferences” in the dropdown menu.
- Click on “Network” in the System Preferences window.
- Select the active network connection on the left-hand side of the window. This will typically be either Wi-Fi or Ethernet.
- The IP address of your macOS machine will be displayed in the “Status” section on the right-hand side of the window, next to the label “IP address“.
Alternatively, you can open the Terminal app on your macOS machine and type the command “ifconfig” to display detailed information about your network connections, including IP addresses. The IP address of your macOS machine will be listed next to the label “inet“.