In App Notifications with the Ionic Framework

I’m working on an app that relies heavily on the concept of in app notifications. Rather than make this app two or more times (in Java for Android, in Objective-C or Swift for iOS, in whatever Windows phones use), I have opted to go hybrid, enabling me to code in JavaScript and deploy anywhere.

Now, all this is tickety boo, except that as you might expect, working in one language for three platforms has its *ahem* caveats.

Before I go further I firstly want to say how amazingly awesome it is that the Ionic Framework even exists, let alone as an open source project that’s free to use for all. I also want to give my love and thanks to all the contributors of plugins that allow Ionic-based apps to do 90%+ of what can be done natively in app.

I can only imagine how difficult it must be to make one plugin that works on multiple platforms, in a market that is as fast paced as the mobile device industry.

Inevitably, I have hit on a few issues as I’ve been working on this app, and a large part of the reason and process behind this is to show what those problems are, and just as importantly, how I have overcome them.

Local Notifications with $cordovaLocalNotification

Sebastián Katzer
Sebastián Katzer

As mentioned, a large part of my app relies on the use of in app notifications.

The gist of the app is that a user can select one or more ‘hours’ to subscribe too / be notified about, and then the mobile device should send an alert when those hours are about to begin.

The obvious starting point here then is the Local Notifications plugin by Sebastián Katzer.

The code itself to get this working is pretty straightforward. This is in large part to the brilliant Wiki documentation that is chock full of helpful examples, coupled nicely with the official documentation – scroll to the bottom of this page for the Ionic-specific Examples section.

So now we have some code to work with:

module.controller('MyCtrl',
  ['$scope', '$rootScope', '$ionicPlatform', '$cordovaLocalNotification',
   function($scope, $rootScope, $ionicPlatform, $cordovaLocalNotification) {

  $ionicPlatform.ready(function () {

    // ========== Scheduling

    $scope.scheduleSingleNotification = function () {
      $cordovaLocalNotification.schedule({
        id: 1,
        title: 'Title here',
        text: 'Text here',
        data: {
          customProperty: 'custom value'
        }
      }).then(function (result) {
        // ...
      });
    };


This is where things started to get interesting for me, and also where things started to go wrong.

My first issue was that whilst all the examples I could find involve $scope, I didn’t have access to this as I was calling the schedule method from a Service.

My solution to this (which may be incorrect, definitely feels incorrect, and is not taking advantage of dependency injection so is hard to test), was to switch to the following:

'use strict';

angular.module('core')
    .service('NotificationUpdater', ['$ionicPlatform',function($ionicPlatform) {

        this.updateNotifications = function (chosenHours) {

            $ionicPlatform.ready(function () {
                cordova.plugins.notification.local.cancelAll(); // left this in for show, but not there in the real code

                var now = new Date().getTime(),
                    _5_sec_from_now = new Date(now + 5 * 1000);

                cordova.plugins.notification.local.schedule({
                    title: "Tweet Hours are Starting",
                    text: "Lorem ipsum dolor sit amet, consectetur adipiscing elit. In nec magna libero. Ut at massa pellentesque massa euismod volutpat id quis metus.",
                    at: _5_sec_from_now,
                    badge: 3
                });
            })
        };


This is a rough draft / proof of concept. But, importantly, it worked. And I say it worked, it took a day and a half of hacking to get it to work. It may not be pretty but by Jove it sends me some damn alerts and right now, that’s good enough.

If Only Coding Were That Easy

Of course, if it had been that simple, it wouldn’t be worth blogging about.

I strongly encourage you to make use of a README.md file in your project, making notes on how you get things to work in your project. It’s all fine and dandy today, but what happens next week, next month, or in my case, an entire year later you decide to pick the project back up and things don’t work as you remember. You may be thinking, Chris, I would just type history in to my terminal and look at what I did to make it work. Well, that’s a solution for sure, but not for many of us, especially if your wife had accidentally tipped a glass of wine over your old Macbook during the interim.

To make things trickier, as mentioned, some things that blow up on one platform, work splendidly on another. A case in point would be when you have failing dependencies that are Android specific, which allow you to run your iOS project but blow up on building your Android project. Hair loss time.

Firstly, check your Ionic info:

ionic info

Your system information:

  • Cordova CLI: 5.0.0
  • Gulp version: CLI version 3.8.1
  • Gulp local: Local version 3.8.11
  • Ionic Version: 1.0.0
  • Ionic CLI Version: 1.4.6-beta.0
  • Ionic App Lib Version: 0.0.22
  • ios-deploy version: Not installed
  • ios-sim version: 3.1.1
  • OS: Mac OS X Yosemite
  • Node Version: v0.12.4
  • Xcode version: Xcode 6.3.1 Build version 6D1002

Updating Node is pretty straightforward on Mac – just download it and run the installer.

As part of getting this to work today, I also ran:

sudo npm install -g driftyco/ionic-cli
sudo npm install -g cordova
sudo npm install -g ionic

I think that can be done as a one-liner, but I didn’t, so I am showing each one as it is in my history.

Android Specific Stuff

Quite possibly the second most time intensive part of this whole process – after debugging why Local Notifications kept blowing up – was the download and install the latest Android SDK stuff. Man. Alive. It took ages.

On Mac:

brew install android-sdk

That bit was pretty quick. Then, as prompted, run:

export ANDROID_HOME=/usr/local/opt/android-sdk

Check the path given by brew installer, as the above may not work for you.

Then:

android

This pops up the Android SDK Manager, which *should* go off and search for all the latest Android stuff that you will need to download (which takes bloody ages), and install (which takes about the same amount of time as downloading).

Android SDK on Mac OSX

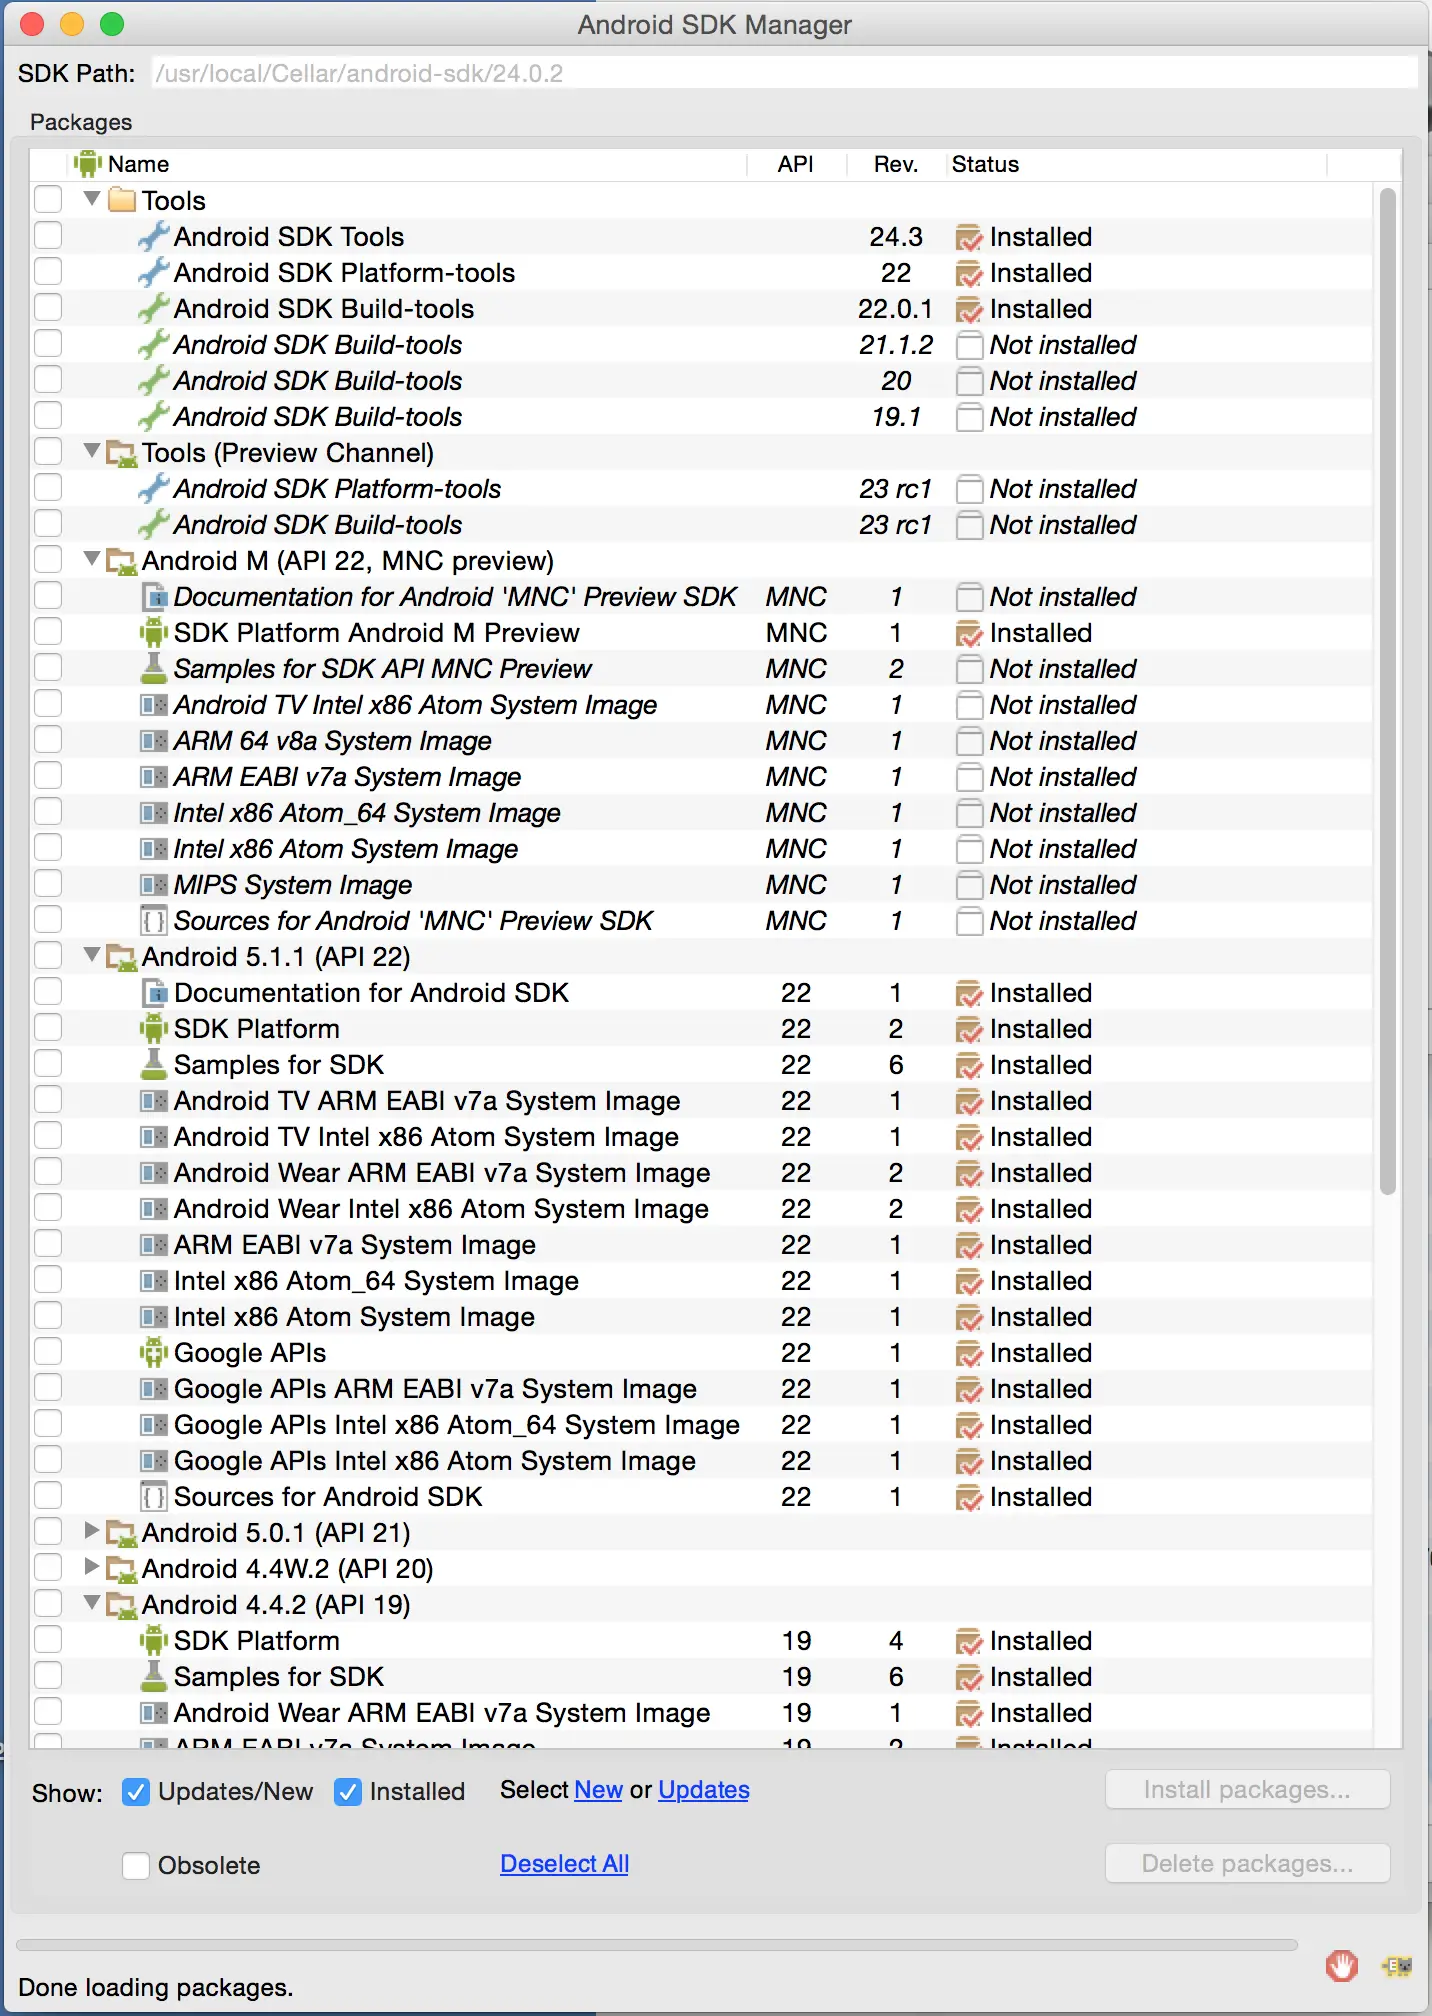
I hit a bit of trouble here which will likely not affect you. As I record my training videos on a distraction free second profile, and because I am making this app as part of a course for Code Review, I couldn’t run the SDK manager from the profile I hadn’t run the brew install android-sdk command from originally. This ultimately involved switching profiles whenever I have needed to update the SDK – which is more frequently than I had anticipated (every other day so far, but then, Android M is releasing currently).

Keeping Ionic in Sync with your Installed Plugins

As mentioned, to get in app Local Notifications to work involved using a plugin.

Installing this plugin is described on the plugin authors website as:

cordova plugin add https://github.com/katzer/cordova-plugin-local-notifications

That was my initial move. There are some other suggested ways of installing this plugin on that website, and I tried all of them.

The problem was, I kept hitting on issues when trying to build for Android, which were predominantly dependency names used in the Katzer provided config.xml which were 404’ing when npm was trying to download them.

Here’s a good example of what I mean:

tweetHours git:(master) ✗ ionic platform rm android && ionic platform add android 
Updated the hooks directory to have execute permissions 
Removing platform from package.json file 
Updated the hooks directory to have execute permissions Adding android project... 
Creating Cordova project for the Android platform: 
  Path: platforms/android 
  Package: com.ionicframework.tweethours247847 
  Name: tweetHours 
  Activity: MainActivity 
  Android target: android-22 
Copying template files... 
Android project created with cordova-android@4.0.0 
Running command: /Users/Shared/Development/tweetHours/hooks/after_prepare/010_add_platform_class.js /Users/Shared/Development/tweetHours 
add to body class: platform-android 
Installing "com.ionic.keyboard" for android 
Installing "cordova-plugin-android-support-v4" for android 
Installing "cordova-plugin-device" for android 
Installing "cordova-plugin-whitelist" for android 
Installing "de.appplant.cordova.common.registerusernotificationsettings" for android 
Installing "de.appplant.cordova.plugin.local-notification" for android 
WARNING: android.support.v4 has been renamed to cordova-plugin-android-support-v4. You may not be getting the latest version! We suggest you cordova plugin rm android.support.v4 and cordova plugin add cordova-plugin-android-support-v4.
Fetching plugin "android.support.v4" via cordova plugins registry 
Fetching from cordova plugins registry failed: EACCES, open '/Users/codereview/.plugman/cache/b41e20d1-android-support-v4.lock' 
Fetching plugin "android.support.v4" via npm 
npm http GET https://registry.npmjs.org/android.support.v4 
npm http 404 https://registry.npmjs.org/android.support.v4 
Fetching from npm failed: 404 Not Found: android.support.v4 Failed to install 'de.appplant.cordova.plugin.local-notification':Error: 404 Not Found: android.support.v4 at RegClient. (/usr/local/lib/node_modules/cordova/node_modules/cordova-lib/node_modules/npm/node_modules/npm-registry-client/lib/request.js:268:14) at Request.self.callback (/usr/local/lib/node_modules/cordova/node_modules/cordova-lib/node_modules/npm/node_modules/request/index.js:148:22) at Request.emit (events.js:110:17) at Request. (/usr/local/lib/node_modules/cordova/node_modules/cordova-lib/node_modules/npm/node_modules/request/index.js:876:14) at Request.emit (events.js:129:20) at IncomingMessage. (/usr/local/lib/node_modules/cordova/node_modules/cordova-lib/node_modules/npm/node_modules/request/index.js:827:12) at IncomingMessage.emit (events.js:129:20) at stream_readable.js:908:16 at process.tickCallback (node.js:355:11) Error: 404 Not Found: android.support.v4 at RegClient. (/usr/local/lib/node_modules/cordova/node_modules/cordova-lib/node_modules/npm/node_modules/npm-registry-client/lib/request.js:268:14) at Request.self.callback (/usr/local/lib/nodemodules/cordova/node_modules/cordova-lib/node_modules/npm/node_modules/request/index.js:148:22) at Request.emit (events.js:110:17) at Request. (/usr/local/lib/nodemodules/cordova/node_modules/cordova-lib/node_modules/npm/node_modules/request/index.js:876:14) at Request.emit (events.js:129:20) at IncomingMessage. (/usr/local/lib/node_modules/cordova/node_modules/cordova-lib/node_modules/npm/node_modules/request/index.js:827:12) at IncomingMessage.emit (events.js:129:20) at stream_readable.js:908:16 at process.tickCallback (node.js:355:11)

It would then promptly bomb out and blow up.

The important line is:

WARNING: android.support.v4 has been renamed to cordova-plugin-android-support-v4. You may not be getting the latest version! We suggest you cordova plugin rm android.support.v4 and cordova plugin add cordova-plugin-android-support-v4.

I tried the obvious – running:

cordova plugin rm android.support.v4 and cordova plugin add cordova-plugin-android-support-v4

And that kinda works. It works because it does what it says on the tin. But the issue is that it’s not you who is managing that dependency, it’s the plugin you are trying to use – in this case, it’s a dependency of the Local Notification plugin (I think, I hit so many of these that this was just the first one I found in my terminal when scrolling back).

As this is a dependency of a plugin, you can’t – directly – change this without submitting a Pull Request, waiting for that PR to be approved, merged, and then having the new version imported. I couldn’t wait that long, and I’m always reluctant to submit a PR to a project I don’t understand how to test. So, instead, I forked it.

I updated the plugins to use the new paths for the dependencies, and all was sorted – on that front. If you’re interested, click here to see the commit history.

For reference, my package.json file looks like this:

{
  "name": "tweethours",
  "version": "0.0.2",
  "description": "tweetHours: An Ionic project",
  "dependencies": {
    "gulp": "^3.5.6",
    "gulp-concat": "^2.2.0",
    "gulp-minify-css": "^0.3.0",
    "gulp-rename": "^1.2.0",
    "gulp-sass": "^1.3.3"
  },
  "devDependencies": {
    "angular-mocks": "^1.4.0",
    "bower": "^1.3.3",
    "gulp-util": "^2.2.14",
    "shelljs": "^0.3.0",
    "karma-chrome-launcher": "^0.1.4",
    "karma-jasmine": "^0.1.5"
  },
  "cordovaPlugins": [
    "cordova-plugin-android-support-v4",
    "cordova-plugin-device",
    "cordova-plugin-whitelist",
    "com.ionic.keyboard",
    {
      "locator": "https://github.com/a6software/cordova-plugin-local-notifications.git",
      "id": "de.appplant.cordova.plugin.local-notification"
    },
    {
      "locator": "https://github.com/katzer/cordova-common-registerusernotificationsettings",
      "id": "de.appplant.cordova.common.registerusernotificationsettings"
    },
    {
      "locator": "https://github.com/EddyVerbruggen/Toast-PhoneGap-Plugin",
      "id": "nl.x-services.plugins.toast"
    }
  ],
  "cordovaPlatforms": [
    "ios",
    {
      "platform": "ios",
      "version": "",
      "locator": "ios"
    },
    "android"
  ]
}

You can make ionic do the dirty work for you on keeping this file updated, just run: ionic state save – but before you do, make sure you have a back up of your package.json just in case.

The reason some of the plugins use the locator and id properties inside their own JSON object is that I added Github repo URLs instead of the package names, e.g.:

cordova plugin add https://github.com/a6software/cordova-plugin-local-notifications.git

instead of:

cordova plugin add de.appplant.cordova.plugin.local-notification

More Problems On Android

However, when building I was still hitting on another issue – this time one with an outstanding pull request.

:generateDebugSources :compileDebugJava/Users/Shared/Development/tweetHours/platforms/android/src/de/appplant/cordova/plugin/localnotification/LocalNotification.java:564: error: cannot find symbol webView.evaluateJavascript(js, null); symbol: method evaluateJavascript(String,) location: variable webView of type CordovaWebView /Users/Shared/Development/tweetHours/platforms/android/src/de/appplant/cordova/plugin/localnotification/LocalNotification.java:561: error: cannot find symbol webView.post(new Runnable(){ symbol: method post() location: variable webView of type CordovaWebView Note: /Users/Shared/Development/tweetHours/platforms/android/src/com/ionic/keyboard/IonicKeyboard.java uses or overrides a deprecated API. Note: Recompile with -Xlint:deprecation for details. 2 errors FAILED

FAILURE: Build failed with an exception.

For me, this issue occured when running ionic run android – I don’t use the emulator, I can’t seem to make the thing work for Android, so this was deploying to a real Android phone.

I applied the fix directly to my own fork, and that resolved the issue.

Don’t Be Afraid To Remove Your Platform

Seemingly the best way to ensure your project is fresh is to remove and re-add your platform whenever you make a change:

ionic platform r, android && ionic platform add android

This way, you can be sure you are getting the exact plugins you expect rather than some existing ones that may be cached / different to what you expect.

This process *should* blow up if any of your plugins have errors / unmet dependencies etc.

Other Things I Had To Do

These bits are things I did which I am unsure whether they helped, but they were done so are here for reference:

sudo chown -R {yourUsername} ~/.android

I found my ~/.android (my user’s home directory /.android dir) was owned by root. This caused the build to fail. The message was quite clear on this. Not sure how it ended up owned by root in the first place mind.

ionic browser remove crosswalk

(http://ionicframework.com/docs/cli/browsers.html)

In App Notifications Working!
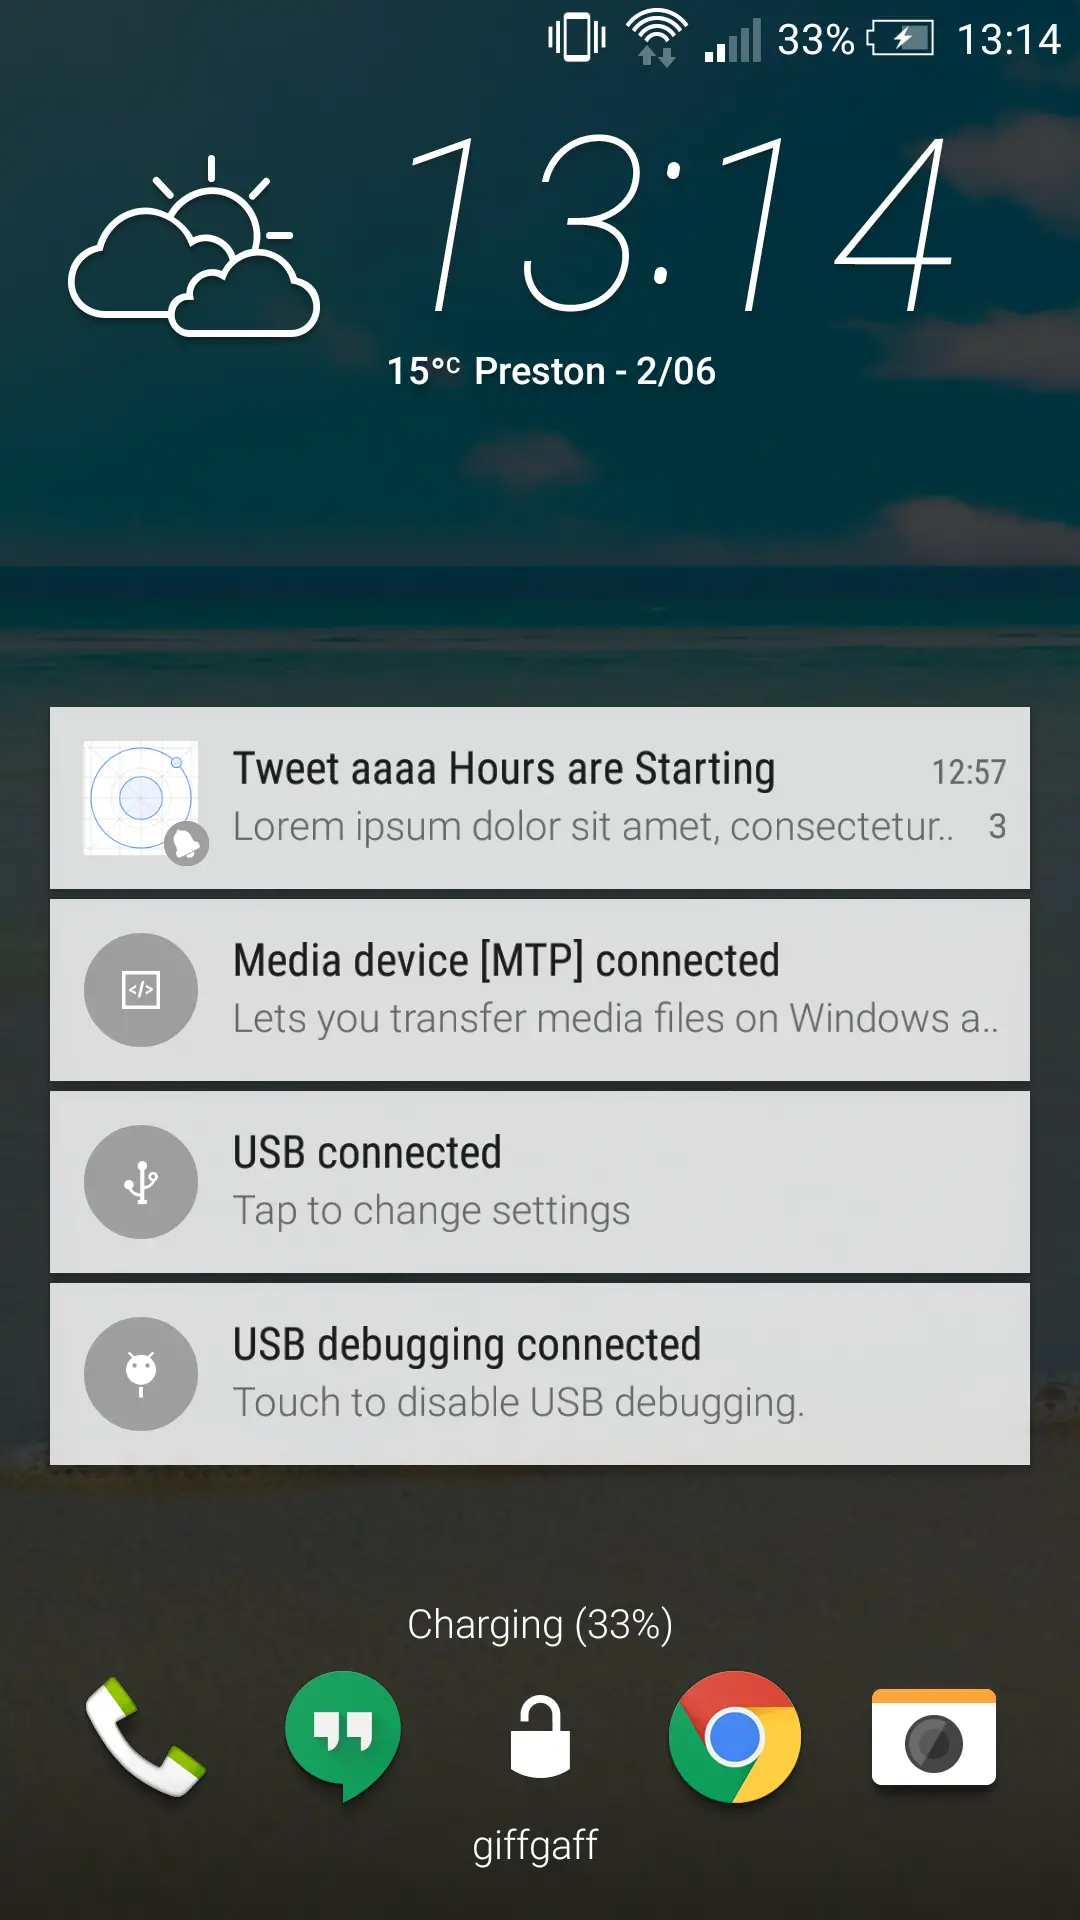
android local notifications with ionic

Success. At last! 🙂

Shhh, Don’t Tell Anyone About My Bit On The Side

Side projects are, in my humble opinion, by far and away the best thing that we as developers (not just a PHP developer, a developer in any language) can do for ourselves, our careers / bank balance, and most importantly, our happiness.

Dell 5K Monitor
Dell 5K Monitor
Having a day job is all fine and dandy. We have to put bread on the table. And that snazzy Dell UltraSharp UP2715K 27″ 5K Widescreen LED Monitor with its 5120×2880 Resolution won’t pay for itself. Good Lord how I want that. Still, with the pace technology moves at, in two years that kind of resolution will be in your pocket on the iPhone 9… but I digress.

The big problem is that in most instances, the code you are writing for your day job is not the code that get’s you excited.

Let’s not blame the code though. It’s unfair to blame that friendly if / else statement. After all, even if you were writing the software of your dreams, you would likely still need a conditional here or there. Or maybe not if you’re Sandi Metz 🙂

Rather, it is the domain in which your software applies that may not be your dream come true.

But we can fix that.

We can work in our dream domain in our own time. In my experience, few are the software developers who don’t have ambitions of making their own app or software company or dream product. And yet, so few work in their own time to make those dreams come true.

Jobs was a poser. He didn't even write code.
Jobs was a poser. He didn’t even write code.

How many times have you thought about learning Python, Go, or the latest JavaScript framework (I am loathe to name just one, for fear this post will be outdated by the time I hit publish)? Every time you look at the job boards no doubt.

What about tinkering with Redis, Elastic Search, or GrayLog?

No, management don’t understand any of that. And anyway, what are you doing looking at that stuff? Get back to work. There’s a thousand unresolved tickets in JIRA. Marketing need to know urgently whether that div with background-color #9888ce converts better than #a89ad5.

Ugh.

Please don’t put your life in the hands, Of a Rock n Roll band, Who’ll throw it all away

Ok, so far, so sweeping generalisations.

I’m not here to rag on day jobs.

Management may very well have good reason why you shouldn’t be looking into blindly adding new tech to their existing stack. But this can’t be your excuse to sit on your hands and stagnate.

I find it baffling that simply because a technology of interest is not in use in the work place / day job, that this is any reason not to actively try / learn about said technology in your own time. And worryingly I see this attitude time and time again.

But Chris, Learning technology in isolation is a bit dull… I hear you cry.

And I agree.

The Roosevelt Elk
The Roosevelt Elk, essential for any modern dev stack
Sitting down to figure out the ELK stack is a worthwhile en devour, but this largely comes down to reading some docs, having a stab at installing all the component parts, seeing the dashboard and thinking: Great! Then, powering down the VM and never looking at it again.

Why?

Because there is no purpose to it. You installed it. It worked. Next.

What is much more interesting is to use the technology in context.

Imagination Station

Let’s imagine a happy place where you have taken that app, that SaaS, that dream of being the next Zuckerberg, and you’ve seen it past the first hurdle… that is, you’ve actually started it. There’s some code on your machine that does something. Regardless of how small that something is, it’s a step towards improving yourself, your career / bank balance, and your happiness.

Now, if this project is of any worth, making sure it doesn’t fall over in some unexpected way should be quite high on your list of priorities – especially as your project grows and you and your end-users start interacting with it.

Suddenly your VM with that lovingly built ELK stack has a purpose. Hurrah. Fire it back up, quick. Let’s find a Symfony bundle to make sending messages from our project to Logstash so we get some nice visuals in our ELK dashboard.

Even if your project ultimately gets shelved, the knowledge you have gained from implementing ELK in a real / production environment puts you well ahead of the majority of your peers.

And of course, the ELK stack is just one such example. I use it because implementing logging / monitoring is an inherently useful and transferable skill to have. Setting this up for one project is no different to setting it up for another – whether that be another side project (you used Ansible right, so this is easy and quick to do?) or for your day job.

I’ve worked in places that actively discourage you from having a side project. May I be the first to say – that’s a stupid policy that can only hurt both you and them. And then there are places like these. This reminds me of that story about the brick layer who build his own house in his spare time, and then found out his home was actually owned by his boss at the building company where he worked. Oh yeah, wait, that never happened.

Continuous Improvement

I want to share with you some tips and tricks I have found to motivate myself towards a lifetime of Continuous Improvement.

1. Make a list.

Start by making a master list of all the projects / dreams / ideas you have in your head.

This doesn’t have to be fancy – pen and paper is a great way to start, but of course, there are likely a ton of apps for this sort of thing too.

I use pen and paper as it’s simple and easy, and available to me when I don’t want to be sat at my computer (shock horror).

If your list is anything at all like mine, it will be long and non-exhaustive. That’s great, keep adding to it whenever you think up something new. Simply writing it down will free up some of your limited head space to focus on the here and now.

And again, if your list is anything like mine, one simple line on an A4 jotter could be a year or more’s worth of work. That’s cool too.

2. Chunk in down

For each item on your master list, start a new page and brain dump everything you think you will need to do to make that idea into a reality.

As most of my ideas are ‘software for x’ kind of things, I like to brain dump everything I think I will need to do to get to v1.0.0.

I have never yet managed to write everything down in such detail that this covers every single task I need to do. That’s cool too. This process is a lot like Behaviour Driven Development (BDD) in that you will only start discovering more of the steps to get you to your goal as you start working on achieving that goal.

Try and write down everything and anything that comes to mind. The amount of mental clarity you will gain from freeing up clogged brain space is a very worthwhile side effect of this exercise.

3. Pick Something… Anything… And Get Started

I found that initially, possibly the hardest part is knowing which project to pick.

This is a nice problem to have. However, it can be frustrating.

My advice – pick the one that has the shortest path to v1.0.0.

By writing out each of your dreams / goals, you should have a much better idea of the timescales each project will involve.

If two or more look very similar in terms of time, choose the one that you would most enjoy.

Once you have picked one, look at your list for this project, pick the easiest thing to do from that last, and get started.

Just make sure you get started!

4. The Daily List & The Daily Review

Whatever you opinion of the daily stand up meeting, completing a similar exercise for yourself and your own projects is highly rewarding.

Just don’t do it first thing in the morning. Do it last thing at night instead.

You already have you high level overview, but the day to day may require more technical information, bug fixing, or time consuming bits of admin.

Running through this first thing in the morning is a time consuming waste of energy. Instead, review, re-organise or re-arrange your task list in the evening. That way you can hit the ground running first thing the following morning, or whenever you next get chance to work on your project.

This is similar in some ways to leaving a failing test when doing TDD or BDD. You work to a point, then leave the test failing for your next / current feature, which in turn makes it much easier to get back into the swing of things when you next load up your code base.

Each night you should review your tasks, prioritise accordingly, and be realistic about what can be achieved the next time you will be working on your side project. The very act of making and reviewing this list will increase your personal productivity significantly, and being able to see a check list of ideas, goals and tasks each ticked off on your paper is hugely motivating.

5. Use Technology You Know

Your own, personal, GitLab
Git is probably the single biggest technological win for me in the past few years.

A simple task on your list of daily tasks towards achieving your goals could be to git init a new project, and push the contents of your dir up to your newly created repo. Progress!

The real power for me has been standing up a Gitlab server for my own private projects.

Inside GitLab you can add in task / bugs lists, add in Wiki entries for complex parts of your project, and generally do 99% of the things you can do with GitHub. About the only thing not there is the public’s code to search.

But the most powerful feature of GitLab for me is the Contributions Calendar. GitHub have this, and if you were to look at my profile you would think I rarely did anything.

Not so. I just commit to private GitLab instances a heck of a lot more than I use GitHub.

Keeping that streak alive is a powerful motivator, and it’s built in for free if you use the same GitLab a lot. Of course, you’re free to use GitHub or whatever, but don’t under estimate the power of seeing all of your daily activity in a friendly little widget.

Share Where? Here. There. Everywhere!

So now you have one or more projects you are working on in your spare time.

You’re immediately ahead of the curve.

This makes your resume more complete. It gives you things to talk about inside an interview situation that aren’t blah blah corporate finance payroll software blah blah. And hopefully it’s got you highly excited about some of the amazing open source tech that makes your world a much better place to be.

You can choose to share these projects any way you see fit.

Of course, be careful about this if you do work for a company where side-projects are banned or frowned upon.

Share the source code via GitHub – hey, free side benefit is your GitHub Contributions Calendar will look awesome!

Talk about your project on your blog – you do have a blog, right? If not, add that to your list.

You don’t have to share your source code – talking about what you’re up too is fine, and sharing some code snippets with a bit of context can be equally helpful.

Always wanted to do a conference talk? Great, your side project is likely interesting to others – maybe not the domain in which you operate, but the process and the journey it’s taken you on.

Meet new, like-minded people. Every language has it’s own community. There are some real lemons in each one, I’m sure. But don’t let that put you off. You will highly likely find some amazing, like minded friends amongst them.

tl; dr

If your passion is coding, do it every single day.

Working on code / in a domain that interests you is much more motivating than coding for a pay-cheque.

As software developers we can build whatever we can dream up.

Dream up something – anything – and get started. The journey is just as important as the destination.

2 Things I Wish I Knew Earlier About Ionic Nav Menu

There’s a couple of issues I have hit on today as I was working through an Ionic nav menu that I wish I knew about earlier.

The good news is, both can be demonstrated in the same code sample.

Let’s see the code first, then go through what it’s doing:

<ion-side-menu side="left" expose-aside-when="large">
    <header class="bar bar-header bar-calm">
        <h1 class="title">Menu</h1>
    </header>

    <ion-content class="has-header">
        <ion-list>
            <ion-item ng-repeat="dayName in days"
                      menu-close
                      ui-sref="app.day-view({day:'{{ dayName }}'})"
                      nav-clear
                      ng-class="isToday(dayName) ? 'item-stable' : ''">
                {{ dayName }}
            </ion-item>
        </ion-list>
    </ion-content>
</ion-side-menu>

Upper Class

The first is that when using the ion-item it’s possible to use the Ionic predefined CSS styles to give your navigation / list items a bit of colour.

The available options are the same that are available for everything else, just prefixed with item:

  • item-light
  • item-stable
  • item-positive
  • item-assertive
  • item-balanced
  • item-energized
  • item-royal
  • item-dark

If you’re unsure about what any of them look like, this is a good example.

Notice, this goes on the ion-item definition, and although I have used ng-class in the example, this can be swapped out for the standard css style class.

Standard CSS example:

<ion-item class="item-stable">list item text here</ion-item>

More dynamic method using ng-class and the ternary operator to do an inline or shorthand if / else.

<ion-item ng-class="yourFunction(yourProperty) ? 'item-stable' : 'item-light'">
  {{ yourProperty }}
</ion-item>

Ionic Losing My History

I’m going to cut right to the chase on this one – if you are finding your ‘back’ operations get all screwed up when using a side menu, then search your project for instances of nav-clear and remove with extreme prejudice.

No doubt this is wanted in some circumstances, but it cost me at least an hour of head scratching today – not helped by the Ionic forums being offline for some reason.

It turns out this nav-clear attribute deletes history, in my case, whenever a user clicks on a different menu option. Not at all what I wanted.

The documentation for this is good, but it’s seemingly hidden. I could only find it with a well thought out (read: after a million attempts) Google, but frustratingly it is all there if you know what to search for.

It just doesn’t show up on the menu anywhere as far as I can see.

Always Open Sidebar (On iPad or Similar)

Even though I said I would do two tips, this third one is worth mentioning. This one didn’t actually cost me any time – it was found whilst Googling for the other problems above.

Anyway, it’s too good not to share.

If you have a side menu and you think it would be a good thing if it was always open, should the device have enough screen space (e.g. on an iPad or similar), then stick in the following:

expose-aside-when="large"

And so long as your device width is >768px it will always show the sidebar.

This one is right there in the documentation, but I thought it was awesome and worth sharing.

Heads Up: Price Increase!

Friday 29th May, Noon GMT

I want to give you a heads up.

The price at CodeReviewVideos.com will be increasing from $14.99 to $24.95 this Friday 29th May at 12:00 Noon GMT.

Subscribe right now and you can lock in at $14.99.

As I write this there are over 130 videos across 24 courses. The Symfony2 for Beginners series is just about ready for upload, and the real world mobile app launch just around the corner…

From Zero to Launch

Symfony2 API + AngularJS / Ionic = TweetHours

I have hinted at this in previous emails, and yesterday I released the teaser video of what’s to come.

If you haven’t already, make sure you check out the app preview video.

I am mid-way through building the app I have named TweetHours. This app is fairly simple in concept:

On Twitter there are ‘hours’ that start with a hashtag. Finding a list of these is a little tricky, and remembering to check Twitter at that particular hour is easy to forget. Using TweetHours you can get a full list of ‘hours’ for any given day, and ‘subscribe’ to that hour so you will get a friendly reminder that it is about to start.

This is exactly the sort of non-complex sounding simple app that should take 20 minutes to throw together and then retire to the Bahamas on the profit.

Except, of course, that is nonsense. There have been all kind of fun little bugs to work through:

  • Subscribing to multiple hours that start at the same time should send one alert, not one alert per subscribed hour
  • Each hour recurs once a week, but DateTime’s apparently hate that as a concept
  • How to track which hours a user is subscribed too without creating a big tangled data mess

And many more trails and tribulations that are / were difficult to foresee when dreaming up this idea over a pint of fine ale.

Show Your Working

In true CodeReviewVideos style, I am showing everything.

The code – front end and back end.

The front end is in the Ionic Framework. This is a snazzy SDK for developing hybrid mobile apps using JavaScript that can be deployed to Android and iOS devices.

The back end is being done in Symfony 2.7 (of course!) and FOS REST Bundle. I’ve covered this in quite some depth in the tutorial series, but seeing how it works in real life is much more interesting.

For testing we will be using Jasmine / Karma for the front end, and Behat 3 for the back end.

The business side of things.

For me, the joy of software is to be able to dream up something and then turn that dream into a working *thing* that can be sold at scale.

Getting this app to v1.0 and into the app store is the end goal. But we aren’t finished there.

Once the app is live, I will be reporting back on what’s involved to keep it running.

How many hours will this take of your time?

What kind of support requests do you have to deal with, and how can this be automated or delegated?

And just how much cash is this thing making, as I believe in total disclosure.

Don’t Miss Out

What is already recorded, and what lies ahead is exactly what I wish I had been shown a year or more ago.

If you’re technical and have an entrepreneurial streak, it’s hard not to have thought about mobile apps before.

This is my exact process that goes from an idea to selling in the app store.

Don’t miss out. Sign up now and lock in at just $14.99.

It’s still incredibly valuable information at $24.99, but why pay $10 more each month if you can act now and save yourself $120 over a single year?

See you on the inside!

Chris

Behat 3 Tables and TableNode Examples

Behaviour Driven Development (BDD) with Behat 3 is a thing of beauty. When combined with PHPSpec you get something I am hugely excited about.

However, there are many ways in which BDD can be daunting not just for the new-comer, but for a new project in general.

Once you have a feature or two written up, copy / pasting and doing a little editing can yield quick results but writing the code that lives in the underlying Feature Context can be a little harder. For me, this was most evident when dealing with Scenarios that contained tabular data.

I made myself a little Behat TableNode cheat sheet to help – at a glance, and whilst in my IDE (PHPStorm btw) – figure out just what might be in my TableNode objects for the specific methods available on that class.

This is an example of the scenario I was working with:

Behat 3 TableNode var_dump

  Background:
    Given the product with id: 3 has the following values:
      | asin       | title         | money | currency | description               |
      | CCCCC33333 | third product | 33.33 | GBP      | third product description |

And a dump of the resulting TableNode:

var_dump($table);

      │ class Behat\Gherkin\Node\TableNode#3316 (2) {
      │   private $table =>
      │   array(2) {
      │     [10] =>
      │     array(5) {
      │       [0] =>
      │       string(4) "asin"
      │       [1] =>
      │       string(5) "title"
      │       [2] =>
      │       string(5) "money"
      │       [3] =>
      │       string(8) "currency"
      │       [4] =>
      │       string(11) "description"
      │     }
      │     [11] =>
      │     array(5) {
      │       [0] =>
      │       string(10) "CCCCC33333"
      │       [1] =>
      │       string(13) "third product"
      │       [2] =>
      │       string(5) "33.33"
      │       [3] =>
      │       string(3) "GBP"
      │       [4] =>
      │       string(25) "third product description"
      │     }
      │   }
      │   private $maxLineLength =>
      │   array(5) {
      │     [0] =>
      │     int(10)
      │     [1] =>
      │     int(13)
      │     [2] =>
      │     int(5)
      │     [3] =>
      │     int(8)
      │     [4] =>
      │     int(25)
      │   }
      │ }

var_dump($table->getRowsHash());

      │ array(2) {
      │   'asin' =>
      │   array(4) {
      │     [0] =>
      │     string(5) "title"
      │     [1] =>
      │     string(5) "money"
      │     [2] =>
      │     string(8) "currency"
      │     [3] =>
      │     string(11) "description"
      │   }
      │   'CCCCC33333' =>
      │   array(4) {
      │     [0] =>
      │     string(13) "third product"
      │     [1] =>
      │     string(5) "33.33"
      │     [2] =>
      │     string(3) "GBP"
      │     [3] =>
      │     string(25) "third product description"
      │   }
      │ }

var_dump($table->getColumnsHash());

      │ array(1) {
      │   [0] =>
      │   array(5) {
      │     'asin' =>
      │     string(10) "CCCCC33333"
      │     'title' =>
      │     string(13) "third product"
      │     'money' =>
      │     string(5) "33.33"
      │     'currency' =>
      │     string(3) "GBP"
      │     'description' =>
      │     string(25) "third product description"
      │   }
      │ }

Hopefully this is as useful a reference to you as it has become for me. Being able to quickly ‘guess’ what is going to be in my TableNode objects and where has helped save me a good deal of time already.